前言
MFC(Microsoft Foundation Classes)是微软在win32 API上,用C++封装的GUI框架,在现在,MFC相比其他的GUI框架有些过时,可以参考:
很多人说 C++ 的 MFC 已经过时了,那新入门的人到底应该学什么?
不同环境的选择:
- 跨平台: QT
- C#: WPF
- Web:React,Vue,Electron
既然如此,为何本文用MFC?
1.部分功能从老MFC项目移植,且VS环境能快速上手
2.技术本身不会过时,过时的是应用场景,GUI回调式的交互机制,以及Win32线程和进程的使用都是通用的技术。这是写本文的原因
本文源码:cursorhu/myMFCForAutoRWTest
GUI界面: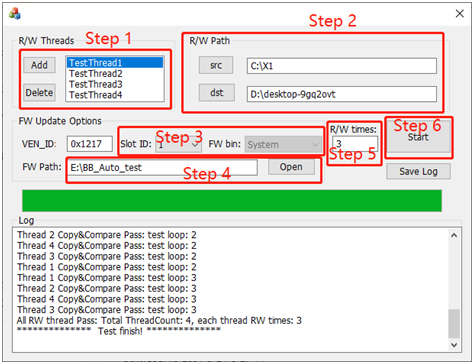
初识MFC项目
VS新建MFC项目,例如“myMFC”,目录结构如下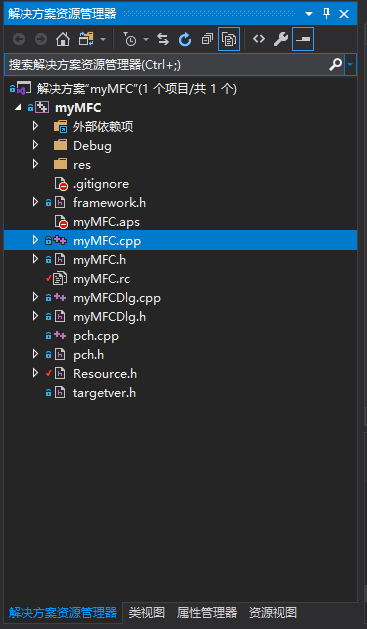
myMFC.cpp是VS自动创建的MFC项目入口,其主要功能是:创建一个窗口实例,注册会话对象(Dialog)
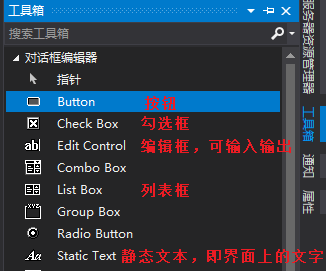
界面的交互一定是分层的
- 对用户的是控件层,即各种按钮,输入输出框等可见可操作的东西
- 处理数据的是逻辑层,例如从输入框输入,底层保存该字符串,点击运行,底层开始执行对应函数
在MFC中,会话对象就是处理底层逻辑的类对象,其方法定义在myMFCDlg.cpp
也是开发的主要内容
MFC入口
下面介绍myMFC.cpp的MFC入口:
BOOL CmyMFCApp::InitInstance()
{
	// 如果一个运行在 Windows XP 上的应用程序清单指定要
	// 使用 ComCtl32.dll 版本 6 或更高版本来启用可视化方式,
	//则需要 InitCommonControlsEx()。  否则,将无法创建窗口。
	INITCOMMONCONTROLSEX InitCtrls;
	InitCtrls.dwSize = sizeof(InitCtrls);
	// 将它设置为包括所有要在应用程序中使用的
	// 公共控件类。
	InitCtrls.dwICC = ICC_WIN95_CLASSES;
	InitCommonControlsEx(&InitCtrls);

	CWinApp::InitInstance();

	AfxEnableControlContainer();

	// 创建 shell 管理器,以防对话框包含
	// 任何 shell 树视图控件或 shell 列表视图控件。
	CShellManager *pShellManager = new CShellManager;

	// 激活“Windows Native”视觉管理器,以便在 MFC 控件中启用主题
	CMFCVisualManager::SetDefaultManager(RUNTIME_CLASS(CMFCVisualManagerWindows));

	// 标准初始化
	// 如果未使用这些功能并希望减小
	// 最终可执行文件的大小,则应移除下列
	// 不需要的特定初始化例程
	// 更改用于存储设置的注册表项
	// TODO: 应适当修改该字符串,
	// 例如修改为公司或组织名
	SetRegistryKey(_T("应用程序向导生成的本地应用程序"));

	CmyMFCDlg dlg;
	m_pMainWnd = &dlg;
	INT_PTR nResponse = dlg.DoModal();
	if (nResponse == IDOK)
	{
		// TODO: 在此放置处理何时用
		//  “确定”来关闭对话框的代码
	}
	else if (nResponse == IDCANCEL)
	{
		// TODO: 在此放置处理何时用
		//  “取消”来关闭对话框的代码
	}
	else if (nResponse == -1)
	{
		TRACE(traceAppMsg, 0, "警告: 对话框创建失败,应用程序将意外终止。\n");
		TRACE(traceAppMsg, 0, "警告: 如果您在对话框上使用 MFC 控件,则无法 #define _AFX_NO_MFC_CONTROLS_IN_DIALOGS。\n");
	}

	// 删除上面创建的 shell 管理器。
	if (pShellManager != nullptr)
	{
		delete pShellManager;
	}

#if !defined(_AFXDLL) && !defined(_AFX_NO_MFC_CONTROLS_IN_DIALOGS)
	ControlBarCleanUp();
#endif

	return FALSE;
}
只需要关注这几句
CmyMFCDlg dlg;
m_pMainWnd = &dlg;
INT_PTR nResponse = dlg.DoModal();
CmyMFCDlg类是在myMFCDlg.cpp定义的,即底层逻辑类。m_pMainWnd是myMFC.cpp的CmyMFCApp类(继承win32 API)的成员,表示主窗口,这两句就是把会话对象注册到窗口类,这样窗口运行时可以回调会话对象的方法。dlg.DoModal()是运行会话窗口,运行哪个会话?其调用者CmyMFCDlg类对象dlg。
MFC逻辑层
VS自动创建myMFC项目的会话逻辑层,myMFCDlg.cpp
几个自动生成的方法如下,这里为了作为示例,加了自定义的类成员m_src, m_dst和方法OnBnClickedButtonsrc,OnBnClickedButtondst
(1)会话类构造函数
CmyMFCDlg::CmyMFCDlg(CWnd* pParent /*=nullptr*/)
	: CDialogEx(IDD_MYMFC_DIALOG, pParent)
	, m_src(_T("")) //初始化为空串,_T是兼容不同编码的转换
    , m_dst(_T(""))
{
	m_hIcon = AfxGetApp()->LoadIcon(IDR_MAINFRAME);
}
(2)界面和类成员数据关联
void CmyMFCDlg::DoDataExchange(CDataExchange* pDX)
{
	CDialogEx::DoDataExchange(pDX);
	DDX_Text(pDX, IDC_EDIT_src, m_src); //关联m_src和IDC_EDIT_src控件,该控件是界面输入框
	DDX_Text(pDX, IDC_EDIT_dst, m_dst);
}
(3)界面和类方法的关联
BEGIN_MESSAGE_MAP(CmyMFCDlg, CDialogEx)
	ON_WM_SYSCOMMAND()
	ON_WM_PAINT()
	ON_WM_QUERYDRAGICON()
	ON_BN_CLICKED(IDC_BUTTON_src, &CmyMFCDlg::OnBnClickedButtonsrc) //关联IDC_BUTTON_src按钮和OnBnClickedButtonsrc方法
	ON_BN_CLICKED(IDC_BUTTON_dst, &CmyMFCDlg::OnBnClickedButtondst)
END_MESSAGE_MAP()
类在头文件的定义:
class CmyMFCDlg : public CDialogEx
{
// 构造
public:
	CmyMFCDlg(CWnd* pParent = nullptr);	// 标准构造函数

// 对话框数据
#ifdef AFX_DESIGN_TIME
	enum { IDD = IDD_MYMFC_DIALOG };
#endif

	protected:
	virtual void DoDataExchange(CDataExchange* pDX);	// DDX/DDV 支持

// 实现
protected:
	HICON m_hIcon;

	// 生成的消息映射函数
	virtual BOOL OnInitDialog();
	afx_msg void OnSysCommand(UINT nID, LPARAM lParam);
	afx_msg void OnPaint();
	afx_msg HCURSOR OnQueryDragIcon();
	DECLARE_MESSAGE_MAP()

public:
	CString m_src; //CString: MFC的字符串类型
	CString m_dst;
	afx_msg void OnBnClickedButtonsrc(); //afx_msg: MFC的方法对应的消息响应类型
	afx_msg void OnBnClickedButtondst();
};
在VS环境下,这些变量和方法的定义都不需要写代码,在控件资源视图直接配置即可。
界面资源层
注意项目文件有个Resource.h,包含界面相关的资源,如每个按钮有个ID,这个不要手动配置,在编辑UI控件时自动生成
//{{NO_DEPENDENCIES}}
// Microsoft Visual C++ 生成的包含文件。
// 供 myMFC.rc 使用
//
#define IDM_ABOUTBOX                    0x0010
#define IDD_ABOUTBOX                    100
#define IDS_ABOUTBOX                    101
#define IDD_MYMFC_DIALOG                102
#define IDR_MAINFRAME                   128
#define IDC_BUTTON_src                  1000
#define IDC_BUTTON_dst                  1001
myMFC.rc是UI的资源文件,打开就是UI界面
可以看到界面的按钮,右键查看属性,可以修改标题和控件ID,会映射到Resource.h。双击按钮,myMFCDlg.cpp会自动创建方法CmyMFCDlg::OnBnClickedButtondst(),头文件自动加方法声明。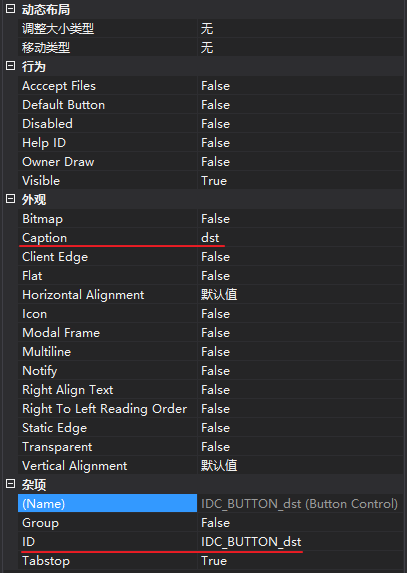
前文的Dlg.cpp中的控件ID, dlg类的方法,变量,从一开始就可以从资源界面配置,自动生成:
- 在资源界面选按钮或其他控件
- 右键配置控件ID
- 右键添加值变量或控件变量
- 双击添加方法
关于值变量和控件变量:
值变量用于关联界面和类成员,值变量就是类成员名,例如点击dst按钮调用其方法后,获得的路径,会写入m_dst值变量
控件变量代表控件本身,用于底层逻辑中,直接调用控件的方法,例如控件变量叫dst_ctrl,可以在某个方法中ctrl_dst.SetWindowText(_T(""))清空界面的字符串
简单拷贝校验的实现
实现从src目录拷贝所有文件到dst目录,并比较拷贝前后的文件是否一致
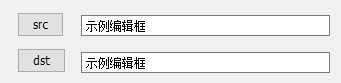
获取文件路径
两个路径选择按钮和对应的编辑框显示路径,一个Start按钮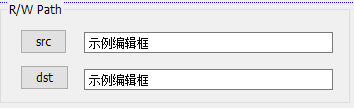
button src的方法:
void CmyMFCDlg::OnBnClickedButtonsrc()
{
	CString SrcPath;
	SrcPath = GetFolderPath(); //获取文件夹路径
	ctrl_src.SetWindowText(SrcPath); //显示获取的路径字符串
	m_src = SrcPath; //保存路径到会话对象的变量
}
GetFolderPath打开一个目录框,让用户选择:
SHBrowseForFolder是win32 API,专用于打开目录
CString CmyMFCDlg::GetFolderPath(void)
{
	CString strPath;
	BROWSEINFO bInfo;
	ZeroMemory(&bInfo, sizeof(bInfo));
	bInfo.hwndOwner = m_hWnd;
	bInfo.lpszTitle = _T("Select Folder: ");
	bInfo.ulFlags = BIF_RETURNONLYFSDIRS;

	LPITEMIDLIST lpDlist;
	lpDlist = SHBrowseForFolder(&bInfo); //win32 API, 打开目录
	if (lpDlist != NULL)
	{
		TCHAR chPath[255];
		SHGetPathFromIDList(lpDlist, chPath);
		strPath = chPath;
	}
	return strPath;
}
如果是打开文件,用CFileDialog
CString CmyMFCDlg::GetFilePath(void)
{
	CFileDialog mFileDlg(TRUE, NULL, NULL,
		OFN_HIDEREADONLY | OFN_OVERWRITEPROMPT | OFN_ALLOWMULTISELECT | OFN_NOCHANGEDIR,
		_T("All Files(*.*)|*.*||"), AfxGetMainWnd());
	CString str(" ", 10000);
	mFileDlg.m_ofn.lpstrFile = str.GetBuffer(10000);
	mFileDlg.m_ofn.lpstrTitle = _T("Select File");
	str.ReleaseBuffer();
	mFileDlg.DoModal();
	POSITION mPos = mFileDlg.GetStartPosition();
	CFileStatus status;
	CString strPath;
	while (mPos != NULL)
	{
		strPath = mFileDlg.GetNextPathName(mPos);
		CFile::GetStatus(strPath, status);
	}
	return strPath;
}
不管哪一种,效果如下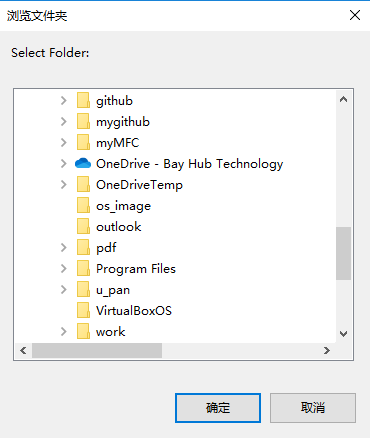
选择完后,路径会在编辑框显示,这就是控件语句ctrl_src.SetWindowText(SrcPath)的效果
拷贝和比较
拷贝函数如下,只需关注几个函数:
- CFileFind类的CFileFind(), FindNextFile(), GetFilePath(), GetFilePath(),这些都是afx.h定义,属于MFC库的类
- CopyFile(), 执行拷贝,这个也是继承自MFC类
代码:
BOOL CmyMFCDlg::ModeTestCopyFileFromSRCtoDST(CString SRC, CString DST, CString& StrResult)
{

	CFileFind ff, ff_DST;
	CString SRCDir = SRC;                 //source folder path
	CString DSTDir = DST;
	UINT copyFileResult = 0;
	int i = 0;

	BOOL bmakedir = MakeDirectory(DSTDir);

	if (SRCDir.Right(1) != _T("\\"))
		SRCDir += _T("\\");
	SRCDir += _T("*.*");

	if (DSTDir.Right(1) != _T("\\"))
		DSTDir += _T("\\");
SetLastError(0);
CString DST_tmp = DSTDir + _T(“.“);
BOOL res_DST = ff_DST.FindFile(DST_tmp);
if (res_DST == 0)
{
StrResult.Format(_T(“Access DST folder error, error code is %d. “), GetLastError());
}
BOOL res = ff.FindFile(SRCDir);
while (res)
{
res = ff.FindNextFile();
if (!ff.IsDirectory() && !ff.IsDots())
{
CString DSTFildPath;
CString SRCFilePath = ff.GetFilePath();
DSTFildPath = DSTDir + ff.GetFileName();
copyFileResult = CopyFile(ff.GetFilePath(), DSTFildPath, FALSE);
Sleep(2000);
if (copyFileResult == 0)
{
DWORD ErrCode = GetLastError();
StrResult.Format(_T(“CopyFile failed! The ErrCode is %d. “), ErrCode);
				for (i = 0; i < 10; i++)
				{
					copyFileResult = CopyFile(ff.GetFilePath(), DSTFildPath, FALSE);
					Sleep(2000);
					if (copyFileResult == 0)
					{
						ErrCode = GetLastError();
						StrResult.Format(_T("Retry CopyFile failed! The ErrCode is %d. "), ErrCode);
					}
					else
					{
						break;
					}
				}

				if (copyFileResult == 0)
				{
					ff.Close();
					return FALSE;
				}
			}
		}
		else if (ff.IsDirectory() && !ff.IsDots())
		{
			CString DSTFildPath;
			DSTFildPath = DSTDir + ff.GetFileName();
			copyFileResult = ModeTestCopyFileFromSRCtoDST(ff.GetFilePath(), DSTFildPath, StrResult);
			if (copyFileResult == 0)
				break;
		}
	}

	ff.Close();
	if (copyFileResult == 0)
		return FALSE;
	else
		return TRUE;
}
比较两个路径的文件:
其方法是,文件读到buffer, 再用memcmp比较buffer, 其FindNextFile也是如何从目录搜索到文件的关键方法
BOOL CmyMFCDlg::ModeTestCompareFilesBetweenSRCandDST(CString SRC, CString DST, CString& StrResult)
{
	CFileFind ff;
	CString SRCDir = SRC;
	CString DSTDir = DST;
	BOOL bRes = TRUE;
	HANDLE hSrcFile, hDstFile;
	DWORD dwSRCFile, dwDSTFile, dwCB;

	if (SRCDir.Right(1) != _T("\\"))
		SRCDir += _T("\\");
	SRCDir += _T("*.*");

	if (DSTDir.Right(1) != _T("\\"))
		DSTDir += _T("\\");
	hSrcFile = hDstFile = NULL;
	BYTE* pSrcBuffer = new BYTE[M_BUFSIZE];
	BYTE* pDstBuffer = new BYTE[M_BUFSIZE];
	memset(pSrcBuffer, 0, M_BUFSIZE);
	memset(pSrcBuffer, 0, M_BUFSIZE);

	BOOL res = ff.FindFile(SRCDir);

	while (res)
	{
		res = ff.FindNextFile();
		if (!ff.IsDirectory() && !ff.IsDots())
		{
			CString DSTFilePath;
			DSTFilePath = DSTDir + ff.GetFileName();
			CString SRCFilePath = ff.GetFilePath();

			if (hSrcFile)
			{
				CloseHandle(hSrcFile);
				hSrcFile = NULL;
			}

			if (hDstFile)
			{
				CloseHandle(hDstFile);
				hSrcFile = NULL;
			}

			hSrcFile = CreateFile(SRCFilePath, GENERIC_READ, 0, NULL, OPEN_EXISTING, 0, NULL);
			if (hSrcFile == INVALID_HANDLE_VALUE)
			{
				StrResult.Format(_T("\n Create Source file failed!! Error code = %d \n"), GetLastError());
				bRes = FALSE;
				break;
			}

			hDstFile = CreateFile(DSTFilePath, GENERIC_READ, 0, NULL, OPEN_EXISTING, 0, NULL);
			if (hDstFile == INVALID_HANDLE_VALUE)
			{
				StrResult.Format(_T("\n Create Destination file failed!! Error code = %d \n"), GetLastError());
				bRes = FALSE;
				break;
			}

			LARGE_INTEGER SrcFileSize, DstFileSize;

			dwSRCFile = GetFileSizeEx(hSrcFile, &SrcFileSize);
			dwDSTFile = GetFileSizeEx(hDstFile, &DstFileSize);

			if (SrcFileSize.LowPart != DstFileSize.LowPart)
			{
				StrResult.Format(_T("\n Compare file is different!! Src Length = %d, Dest Length = %d \n"), SrcFileSize.LowPart, DstFileSize.LowPart);
				bRes = FALSE;
				break;
			}

			while (SrcFileSize.LowPart > 0)
			{
				BOOL bCmpResult;
				bCmpResult = ReadFile(hSrcFile, pSrcBuffer, M_BUFSIZE, &dwCB, NULL);
				if (bCmpResult == 0)
				{
					bRes = FALSE;
					break;
				}
				bCmpResult = ReadFile(hDstFile, pDstBuffer, M_BUFSIZE, &dwCB, NULL);
				if (bCmpResult == 0)
				{
					bRes = FALSE;
					break;
				}
				bCmpResult = memcmp(pSrcBuffer, pDstBuffer, dwCB);

				if (bCmpResult != 0)
				{
					bRes = FALSE;
					CString DiffByte;

					CString PostCmpErrorStr;
					CString SrcDumpData, DstDumpData;
					StrResult.Format(_T("\n Fatal_Error: Src Data from %d to %d.\n"), (DstFileSize.LowPart - SrcFileSize.LowPart), (DstFileSize.LowPart - SrcFileSize.LowPart + dwCB));

					PostCmpErrorStr = _T("SourceFilePath: ") + SRCFilePath + _T(" To \r\n") + _T("DstFilePath: ") + DSTFilePath;
					StrResult = PostCmpErrorStr + _T("  has compare error! \r\n");
					//HugoPostMessageAndShowSD1(PostCmpErrorStr,1);
					//HugoPostMessageAndShowSD2(PostCmpErrorStr,1);

					::MessageBox(
						NULL,
						(LPCWSTR)L"Compare error happened!!",
						(LPCWSTR)L"Fatal Error!",
						MB_OK
					);

					break;
				}
				SrcFileSize.LowPart -= dwCB;
			}

			if (bRes == FALSE)
				break;
			else
				ReadFile(hDstFile, pDstBuffer, 512, &dwCB, NULL);
		}
		else if (ff.IsDirectory() && !ff.IsDots())
		{
			CString DSTFildPath;
			DSTFildPath = DSTDir + ff.GetFileName();
			bRes = ModeTestCompareFilesBetweenSRCandDST(ff.GetFilePath(), DSTFildPath, StrResult);
			if (bRes == FALSE)
				break;
		}
	}

	if (hSrcFile)
	{
		CloseHandle(hSrcFile);
		hSrcFile = NULL;
	}

	if (hDstFile)
	{
		CloseHandle(hDstFile);
		hSrcFile = NULL;
	}

	if (bRes == FALSE)
	{
		delete[]pSrcBuffer;
		delete[]pDstBuffer;
		ff.Close();
		return FALSE;
	}
	else
	{
		delete[]pSrcBuffer;
		delete[]pDstBuffer;
		ff.Close();
		return TRUE;
	}
}
关于CString的格式化输出:MFC中CString.Format的详细用法
关于CFile文件操作:MFC——文件操作(CFile)
开始按钮
一般操作顺序:选择src和dst,再点击Start按钮
start按钮的方法调用已保存的m_src和m_dst路径,传入拷贝和比较,再输出结果即可,大致流程如下
void CmyMFCDlg::OnBnClickedButtonrun()
{
    //读入所有界面数据
	UpdateData(true);

	BOOL ret;
	CString outStr;

	ret = ModeTestCopyFileFromSRCtoDST(m_src, m_dst, outStr);
	if (!ret)
			MessageBox(NULL, _T(outStr), _T("ERROR"), MB_OK);

	ret = ModeTestCompareFilesBetweenSRCandDST(m_src, m_dst, outStr);
	if (!ret)
			MessageBox(NULL, _T(outStr), _T("ERROR"), MB_OK);
}
这里用messagebox输出结果,即弹窗,弹窗是阻塞式的。也可以用编辑框,写文件输出。
关于messagebox,参考:MessageBox function (winuser.h)
关于updateData:MFC中UpdateData()函数的使用
以上完成一个简单的文件拷贝和比较功能
多线程文件拷贝和写日志
将简单拷贝扩展,支持:
- 多线程拷贝和比较,每个线程完成简单拷贝比较的功能
- 在每个工作线程,输出打印到界面文本框,同时写到同一个日志文件
- 界面主线程需要等待所有工作线程完成后,输出测试完成信息到文本框和日志
线程列表获取各自路径
add和delete配置几个工作线程,每个线程配置其src和dst路径


这种动态增删的列表,在资源界面新建listbox类型变量和方法:
CListBox m_rwlist;
afx_msg void OnLbnSelchangeListrwlist();
Add和Delete对应的方法:
void CmyMFCDlg::OnBnClickedButtonadd()
void CmyMFCDlg::OnBnClickedButtondelete()
Add和Delete的方法控制listbox变量m_rwlist,选中任意m_rwlist后又会调用其方法OnLbnSelchangeListrwlist,获取每个线程各自的src、dst。
按键控制m_rwlist的实现:
void CmyMFCDlg::OnBnClickedButtonadd()
{
	CString Threadtest = _T("TestThread");
	UINT ThreadCount = m_rwlist.GetCount();
	if (ThreadCount == 0)
	{
		m_rwlist.AddString(_T("TestThread1"));
	}
	else if (ThreadCount < MAX_THREAD_COUNT)
	{
		CString ThreadNum;
		ThreadNum.Format(_T("%d"), ThreadCount + 1);
		Threadtest = Threadtest + ThreadNum;
		m_rwlist.AddString(Threadtest);
	}
	else if (ThreadCount == MAX_THREAD_COUNT)
	{
		CString str;
		str.Format(_T("Only support %d threads at most!!"), MAX_THREAD_COUNT);
		MessageBox(str);
	}
	m_rwlist.SetCurSel(ThreadCount);
	if (ThreadCount < MAX_THREAD_COUNT)
		totalThreadCount++;
}

void CmyMFCDlg::OnBnClickedButtondelete()
{
	UINT ThreadCount = m_rwlist.GetCount();
	if (ThreadCount != 0)
	{
		m_rwlist.DeleteString(ThreadCount - 1);
		m_rwlist.SetCurSel(0);
	}
	if (ThreadCount > 0)
		totalThreadCount--;
}
线程列表m_rwlist的方法读取路径到会话对象成员变量:
void CmyMFCDlg::OnLbnSelchangeListrwlist()
{
	UpdateData(true); //update true: 从界面读入值到变量(使上次编辑生效)
	if (m_rwlist.GetCount() != 0)
	{
		UINT selectNum = m_rwlist.GetCurSel();
		RWTestParamArray[selectNum].ThreadNum = m_rwlist.GetCount();
		RefreshRWParam(RWTestParamArray, selectNum);
	}
}

void CmyMFCDlg::RefreshRWParam(TabDialogRWTestParam(&Array)[MAX_THREAD_COUNT], UINT CSel)
{
	ctrl_src.SetWindowText(Array[CSel].SRCFolder_Path);
	ctrl_dst.SetWindowText(Array[CSel].DSTFolder_Path);

	UpdateData(false); //update false: 把变量写入到界面(实时显示)
}
真正读入路径的是dst、src按钮的方法:
void CmyMFCDlg::OnBnClickedButtonsrc()
{
	CString SrcPath;
	UINT ThreadCSelNum = m_rwlist.GetCurSel();
	SrcPath = GetFolderPath();
	ctrl_src.SetWindowText(SrcPath);
	RWTestParamArray[ThreadCSelNum].SRCFolder_Path = SrcPath;
}

void CmyMFCDlg::OnBnClickedButtondst()
{
	CString DstPath;
	UINT ThreadCSelNum = m_rwlist.GetCurSel();
	DstPath = GetFolderPath();
	ctrl_dst.SetWindowText(DstPath);
	RWTestParamArray[ThreadCSelNum].DSTFolder_Path = DstPath;
}
线程数组定义在会话类,存储每个工作线程要用的数据
TabDialogRWTestParam RWTestParamArray[MAX_THREAD_COUNT];
typedef struct TabRWParam
{
	CString SRCFolder_Path;
	CString DSTFolder_Path;
	UINT ThreadNum;
	UINT TestTimes;
}TabDialogRWTestParam;
创建线程
创建线程参考MS文档:beginthread、_beginthreadex
关注2点:
- 传入线程内要执行的函数,和参数(可为NULL)
- 返回线程句柄,如果是多个线程则是个数组
创建线程的部分代码:
void CmyMFCDlg::RunModeTestInstance()
{
    ....

	//线程内除了对象,还需要知道自己是哪个线程,因此打包this和ThreadCount
	pTransParam ThreadTransPArray[MAX_THREAD_COUNT];

	for (int i = 0; i < totalThreadCount; i++)
	{
		ThreadTransPArray[i] = new(TransParam);
		ThreadTransPArray[i]->i = i;
		ThreadTransPArray[i]->translpParam = this;

		unsigned int rwThreadID;

		//hThread defined as global data
		hThread[i] = (HANDLE)_beginthreadex(
			NULL,
			0,
			DoThreadProc,
			ThreadTransPArray[i],
			0,
			&rwThreadID);

		if (hThread[i] == NULL)
			MessageBox(_T("CreateThread Fail!!"), MB_OK);

		....

		//release resource
    	for (int i = 0; i < totalThreadCount; i++)
    	{
    		delete ThreadTransPArray[i];
    		ThreadTransPArray[i] = NULL;
    		CloseHandle(hThread[i]);
    	}
	}
由于要在线程内打印当前是哪个线程,这个从Dlg对象的this指针是获取不到的,因此把this指针和线程id打包结构体,传入DoThreadProc线程函数,结构体如下
typedef struct transParam
{
	LPVOID translpParam;
	int i;
}TransParam, *pTransParam;

#define MAX_THREAD_COUNT 6
注意使用完后释放线程句柄和其他相关资源
主线程和工作线程的通信:Message机制
先明白几点:
- 所有工作线程都共享主线程(界面线程)的数据,即会话类对象的成员
- 界面控件的操作函数,都是主线程独有的,工作线程不能调用
- 主线程如果要等待工作线程,一般会阻塞
问题:
如何将工作线程的打印输出到主线程界面控件?
Windows消息机制可以解决工作线程和主线程通信问题,简单的讲,主线程有消息队列,工作线程可以发送消息到消息队列中,主线程用FIFO原则处理队列中的消息,在阻塞等待动作线程时,也支持消息队列的处理。
关于消息队列:windows消息机制(MFC)
(1)工作线程函数
unsigned int WINAPI DoThreadProc(void *threadTransParam)
{
	pTransParam pTrans = (pTransParam)threadTransParam;
	CString strResult;
	BOOL res = 0;

	CmyMFCDlg* pDlg = (CmyMFCDlg *)pTrans->translpParam;
	int thread_id = pTrans->i;

	for (int i = 0; i < (int)pDlg->rwtime; i++)
	{

		res = pDlg->ModeTestCopyFileFromSRCtoDST(pDlg->RWTestParamArray[thread_id].SRCFolder_Path, pDlg->RWTestParamArray[thread_id].DSTFolder_Path, strResult);

		res = pDlg->ModeTestCompareFilesBetweenSRCandDST(pDlg->RWTestParamArray[thread_id].SRCFolder_Path, pDlg->RWTestParamArray[thread_id].DSTFolder_Path, strResult);
		if (res)
		{
			criticalSec.Lock();
			::PostMessage(pDlg->GetSafeHwnd(), WM_USER_MSG, WPARAM(thread_id + 1), LPARAM(i + 1));
			criticalSec.Unlock();
		}
	}

	return res;
}
几点说明:
- 线程函数要用WINAPI实现,不属于会话类内的方法,因此需要this指针显式调用
- rwtime是测试次数,每个线程执行多次拷贝比较
- PostMessage是发布消息到主线程消息队列,可以传参:WPARAM和LPARAM
- 由于不确定PostMessage是不是线程安全,这里加了锁:CCriticalSection类型的criticalSec
(2)消息处理函数
来看message处理函数:
LRESULT CmyMFCDlg::OnMsg(WPARAM wp, LPARAM lp)
{
	strAppend.Format(_T("Thread %d src:%s ---> des:%s, Copy&Compare Pass: test loop: %d \n"), wp, RWTestParamArray[wp-1].SRCFolder_Path, RWTestParamArray[wp-1].DSTFolder_Path, lp);
	ShowLogInEditBox(); //字符串显示到界面
	return 0;
}
主界面字符串显示函数
/* call by message handler, for multiple child thread*/
void CmyMFCDlg::ShowLogInEditBox()
{
	CString str;
	UINT i;

	/*message 队列只在主线程内处理,无需加锁*/
	//criticalSec.Lock();
		WriteLogFile(this->strAppend); //only write append str
	//criticalSec.Unlock();

	this->GetDlgItemText(IDC_EDIT_logbox, str);
	str += this->strAppend; //update old+append str
	str += "\r\n"; //这里换行没用,要在控件设置中允许换行

	this->SetDlgItemText(IDC_EDIT_logbox, str);

	i = ((CEdit*)GetDlgItem(IDC_EDIT_logbox))->GetLineCount();
	((CEdit*)GetDlgItem(IDC_EDIT_logbox))->LineScroll(++i, 0); //定位到下一行

}
写日志的相关方法如下:
BOOL CmyMFCDlg::CreateLogFile()
{
	CString strName;
	SYSTEMTIME st;

	GetLocalTime(&st);
	strName.Format(_T("UtilityLogFile_%4d-%d-%d_%d-%d-%d.log"), st.wYear, st.wMonth, st.wDay, st.wHour, st.wMinute, st.wSecond);

	if (!m_File.Open(strName, (CFile::modeCreate | CFile::modeReadWrite), 0))
	{
		::AfxMessageBox(_T("Create Utility Log File Error!!"));
		return FALSE;
	}

	m_logCreated = 1;
	return TRUE;
}

void CmyMFCDlg::WriteLogFile(CString str)
{
	BOOL CreateRes = TRUE;

	if (m_logCreated == 0)
		CreateRes = CreateLogFile();

	if (CreateRes)
	{
		str += _T("\r\n");
		int length = str.GetLength();
		length *= 2;
		m_File.Write(str, length);
		m_File.Flush();
	}
}

void CmyMFCDlg::CloseLogFile()
{
	if (m_logCreated == 1)
	{
		m_File.Close();
		m_logCreated = 0;
	}
}
注意message处理函数的关键点:
- 只在主线程中处理,不存在其他线程操作,无临界区问题。因此上述的窗口输出,日志文件写入都是线程安全的。
编辑框作为输出要注意几点:
- 换行要在设置里配置,字符串换行没用
- 设置输出滚动显示
效果如下: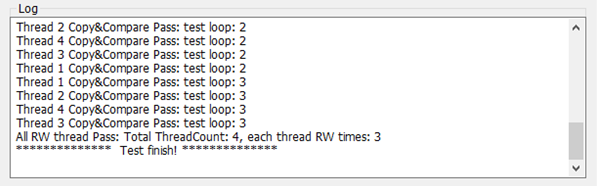
(3)线程同步
日志完成的输出是主线程等待所有工作线程函数返回后才执行,如何实现?
参考:WaitForMultipleObject与MsgWaitForMultipleObjects用法
我们的需求是主线程在阻塞等待时要处理消息,因此用MsgWaitForMultipleObjects方法。
代码如下:
//wait all child threads return

	/*
	//主线程阻塞,不能处理消息
	DWORD dwWaitResult = WaitForMultipleObjects(
		totalThreadCount,
		hThread,
		TRUE,
		INFINITE);
	*/
	//主线程阻塞,但不阻塞消息
	int nWaitCount = totalThreadCount;
	int nExitThreadCount = 0;      //标记已经有几个线程退出了
	BOOL bWaitAll = FALSE;		//不等待所有线程完成,实时处理。如果TRUE, 会阻塞到所有线程完成
	DWORD result;
	MSG msg;

	while (TRUE)
	{
		/*该函数等待:多个线程的完成信号,或其他消息信号,有任意一种就返回
		*返回值为[WAIT_OBJECT_0, WAIT_OBJECT_0 + nWaitCount - 1]表示对应下标的线程已完成
		*返回值为WAIT_OBJECT_0 + nWaitCount表示有其他信号,如线程内发送的message
		*WAIT_OBJECT_0值为0
		*/
		result = MsgWaitForMultipleObjects(nWaitCount, hThread, bWaitAll, INFINITE, QS_ALLINPUT);

		if (result == WAIT_OBJECT_0 + nWaitCount) //表示收到消息
		{
			while (PeekMessage(&msg, NULL, 0, 0, PM_REMOVE)) //处理所有已入队的消息
			{
				TranslateMessage(&msg); //message translat and format, add into message queue
				DispatchMessage(&msg); //call message handler
			}
		}
		else if (result >= WAIT_OBJECT_0 && result < WAIT_OBJECT_0 + nWaitCount) //表示收到了线程结束信号
		{
			nExitThreadCount++;
			if (nExitThreadCount < totalThreadCount)
			{
				/*必须更新hThread,否则已退出的线程一直被检测到*/
				int nIndex = result - WAIT_OBJECT_0; //退出线程的index
				hThread[nIndex] = hThread[nWaitCount - 1]; //更新等待列表:hThread, 交换退出的成员和尾部成员
				hThread[nWaitCount - 1] = NULL;

				nWaitCount--; //更新要等待的线程数
			}
			else
			{
				break; //等待的所有线程都已完成
			}
		}
	}

	//All threads returned
MsgWaitForMultipleObjects的MS说明文档:MsgWaitForMultipleObjects function (winuser.h)
返回值的含义是重点,这个文档说的很隐晦: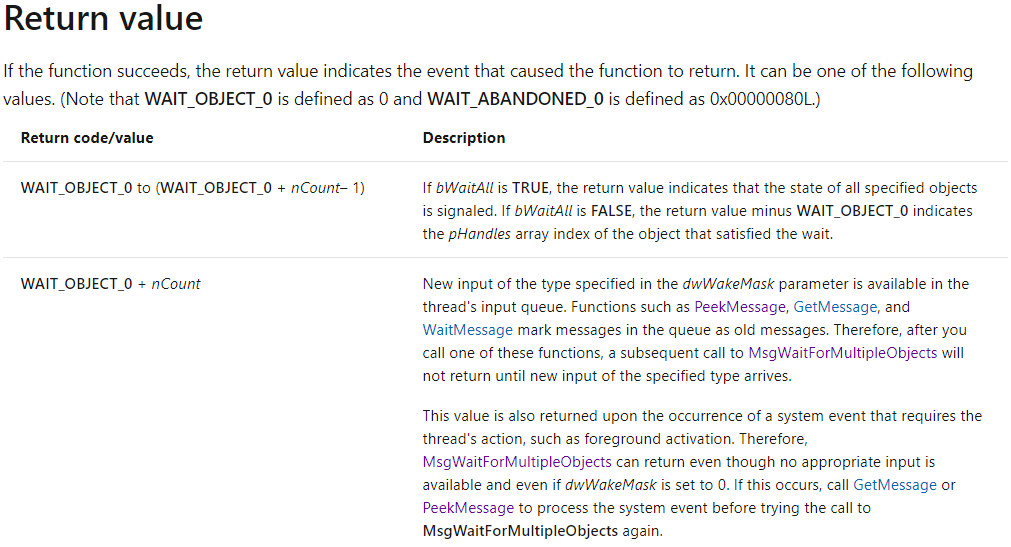
大意是:等待n个线程
- 如果返回的值i是属于0~n-1,说明第i个工作线程结束了
- 如果返回值是n,不是线程结束,而是收了到消息,例如工作线程内发送的消息。
因此代码逻辑是:
1.如果有消息,就处理消息
关于message的peek,translate和dispatch:
PeekMessage使用方法
消息循环中TranslateMessage和Dispatch函数的作用
2.如果有线程结束,要更新线程句柄数组,只保留未等待到的线程;
当所有线程都等待到,退出等待循环
以上完成了主线程和多个工作线程的同步机制
再进一步:调用其他进程
现需求如下:
有多个功能的FW需要测试,要求测试工具遍历每个FW, 调用其他的程序,更新到磁盘固件后,做之前的多进程读写比较流程
重点关注如何调用其他程序。假设FW更新程序是FirwmareUpdateTool.exe,接受FW相关的参数
需要实现:
- 界面接收参数
- 调用其他程序,传参,且注意与主线程的同步
代码:
BOOL CmyMFCDlg::DoUpdateFirmware(CString filename)
{
	TCHAR szFilePath[MAX_PATH + 1] = { 0 };
	GetModuleFileName(NULL, szFilePath, MAX_PATH);
	(_tcsrchr(szFilePath, _T('\\')))[1] = 0;

	CString strToolPath(szFilePath);
	strToolPath = strToolPath + _T("FirwmareUpdateTool.exe");
	CString strPath;
	strPath.Format(_T("%s %s %s %d"), strToolPath.GetBuffer(0), m_str_VendorID.GetBuffer(0), filename.GetBuffer(0), m_SlotID);

	strAppend = strPath;
	ShowLogInEditBox();

	if (!PathFileExists(strToolPath))
	{
		strAppend.Format(_T("The %s is not exist!"), strToolPath.GetBuffer(0));
		ShowLogInEditBox();
		MessageBox(strAppend, MB_OK);
		return FALSE;
	}

	STARTUPINFO si = { sizeof(STARTUPINFO) };//在产生子进程时,子进程的窗口相关信息
	PROCESS_INFORMATION pi;                  //子进程的ID/线程相关信息
	memset(&pi, 0, sizeof(PROCESS_INFORMATION));
	DWORD returnCode = -1;              //用于保存子程进的返回值;

	BOOL bRet = CreateProcess(              //调用失败,返回0;调用成功返回非0;
		NULL,                               //一般都是空;(另一种批处理情况:此参数指定"cmd.exe",下一个命令行参数 "/c otherBatFile")
		strPath.GetBuffer(0),              //命令行参数
		NULL,                               //_In_opt_    LPSECURITY_ATTRIBUTES lpProcessAttributes,
		NULL,                               //_In_opt_    LPSECURITY_ATTRIBUTES lpThreadAttributes,
		FALSE,                              //_In_        BOOL                  bInheritHandles,
		CREATE_NEW_CONSOLE,                 //新的进程使用新的窗口。
		NULL,                               //_In_opt_    LPVOID                lpEnvironment,
		NULL,                               //_In_opt_    LPCTSTR               lpCurrentDirectory,
		&si,                                //_In_        LPSTARTUPINFO         lpStartupInfo,
		&pi);                               //_Out_       LPPROCESS_INFORMATION lpProcessInformation

	if (bRet)
	{
		while (TRUE) //这里也是为了输出打印和日志而等待进程,同时也阻塞了主线程
		{
			DWORD result;
			MSG msg;
			result = MsgWaitForMultipleObjects(1, &pi.hProcess, FALSE, INFINITE, QS_ALLINPUT);
			if (result == (WAIT_OBJECT_0))
			{
				//获取子进程的返回值
				GetExitCodeProcess(pi.hProcess, &returnCode);
				CloseHandle(pi.hThread);
				CloseHandle(pi.hProcess);
				break;
			}
			else
			{
				PeekMessage(&msg, NULL, 0, 0, PM_REMOVE);
				DispatchMessage(&msg);
			}
		}
		strAppend.Format(_T("%s returnCode : %d "), strToolPath.GetBuffer(0), returnCode);
		ShowLogInEditBox();
	}
	else
	{
		strAppend.Format(_T("Start the %s failed!"), strToolPath.GetBuffer(0));
		ShowLogInEditBox();
		MessageBox(strAppend, MB_OK);
	}

	if (!returnCode)
	{
		return TRUE;
	}
	return FALSE;
}
CreateProcess创建进程,执行第三方程序
MsgWaitForMultipleObjects等待第三方进程返回,阻塞了当前主进程
小结
本文涉及的知识点:
- 界面控件与底层类的数据交互
- MFC的文件,字符串操作
- 线程创建和线程同步
- 线程通信:消息机制
- 进程创建与同步