ThinkNotes

Simple is not easy | 化繁为简,知易行难

0%

Blog配置 -- 搭建可移植的Markdown blog环境:Obsidian/Typora+PicGo+Hexo+Github

搭建可移植的Markdown blog环境:Obsidian/Typora+PicGo+Hexo+Github

背景

写技术笔记并发布博客,通常有以下方式:

  • 第三方平台CSDN/cnblogs,最简单但是最不可控,例如写过如何使用shadow-sock直接被删掉,各种广告也不能忍。
  • 使用云服务器自建Leanote博客系统,最大缺点是服务器续费太贵,且文章数据存在数据库很难导出,。
  • 使用github+picgo+hexo, github作为图床和博客的云服务,picgo用于建立图床通道,hexo用于发布博客。缺点是github访问慢,用开源CDN可以很好解决;优点是全部免费,数据可移植(图片链接都在github图床),可长期使用(只要github不倒闭不锁区)

最终我选择github+picgo+hexo方案。
为什么不用gitee: gitee上传图片限制1M, github有25M。有了CDN, github的速度也不是问题

比较几个Markdown编辑器:

VSCode加Markdown插件:体验一般
Typora体验完美,但windows收费(Linux版不收费,Windows旧版不收费)
Obsidian免费,特性:

  • 支持动态渲染,即写出的Markdown语句自动显示预览
  • 支持各种快捷键,无需手动输入Markdown语法格式(Markdown 基本语法)。比如标题,链接,列表,引用,可以设置标准的Markdown快捷键。
  • 支持关联PicGo实现粘贴图片即上传到云端图床,这一点对于写作体验和文章的可迁移性很重要
  • 特色的Zettelkasten笔记管理方法,本文不描述这部分,参考玩转 Obsidian 01:打造知识循环利器

搭建可移植的Markdown写作环境

Github+PicGo搭建图床

图床的用处

Markdown文档本身是可移植的,但是其图片资源不是, 因为图片不是以二进制嵌入文档,而只是个图片地址的链接。

如果只是在本地写写Markdown,完全不需要考虑图片的可移植,只需要存本地固定路径即可。
如果想在本地写Markdown,且这个文档拿到别的机器,或者放到博客论坛发布,别人都可以看到图片,就要一个云端的图片存储服务,即图床。

使用图床,就可以实现Markdown“一处写作,到处可见”。

搭建Github图床,使用Picgo上传

完整流程参考PicGo + GitHub 搭建个人图床工具

流程包含以下部分:

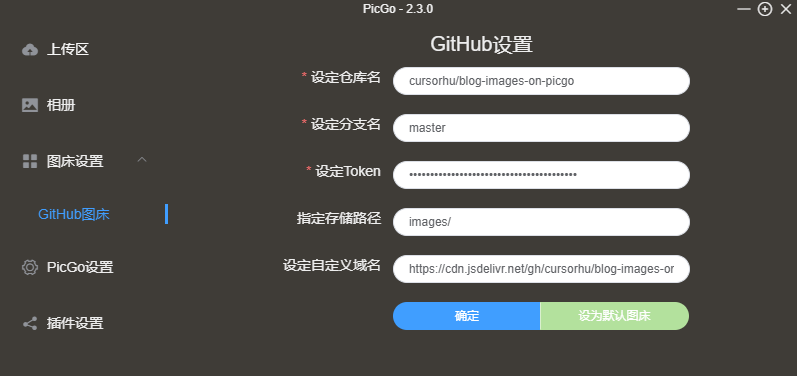
  • 一个public的Github仓库,用来存放文章链接的图片,注意单仓库最大容量1GB。
  • 一个personal access token,用于PicGo免密访问github实现自动上传图片
  • 一个图片上传工具:PicGo及其插件,用它上连Github图床仓库,下连本地markdown编辑器,实现“图片粘贴即上传”
  • 一个CDN(推荐,很好用):使用开源CDN jsdelivr加速Github访问,避免因访问速度造成图片上传失败

最终我的配置如下:

单元测试:
手动上传本地图片,如果上传成功,且图片可预览,则功能正常

遇到的坑:
仓库名必须填<用户名><仓库名>,不是完整的http或git仓库链接!否则上传图片error404

PicGo支持log调试,参考:
PicGo上传图片到GitHub总是失败的特殊解决办法
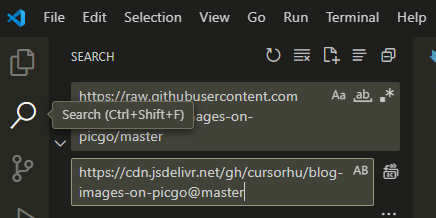
2022/5/17更新:
最近发现jsdelivr在大陆挂了,那么只能放弃使用CDN, 直接使用github图床的raw链接.

将Picgo默认图床路径从jsdelivr的
https://cdn.jsdelivr.net/gh/账户名/图床仓库名@master
改为:
https://raw.githubusercontent.com/账户名/图床仓库名/master

注意master前是@还是反斜杠 ‘’/‘’.

对于已发布的博客的图床链接,直接用VSCode全局查找替换以上前缀即可,后面的图片id是不变的。
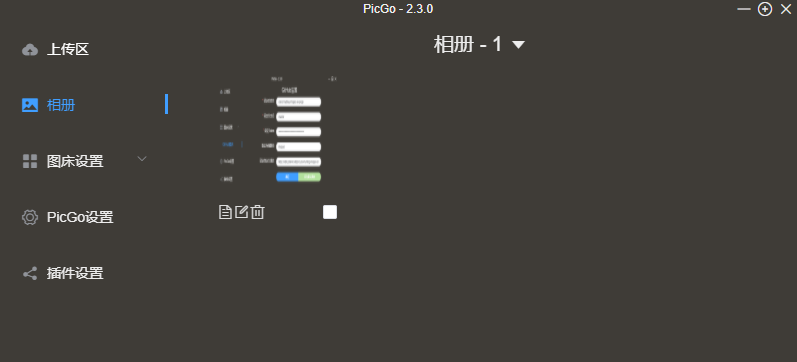
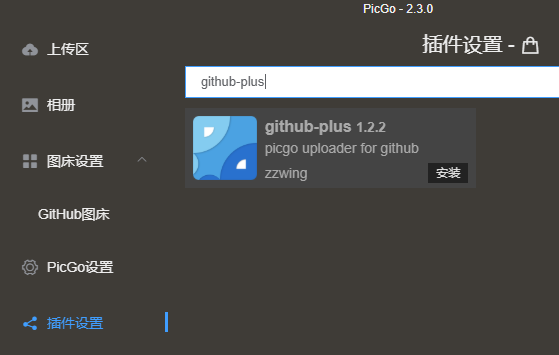
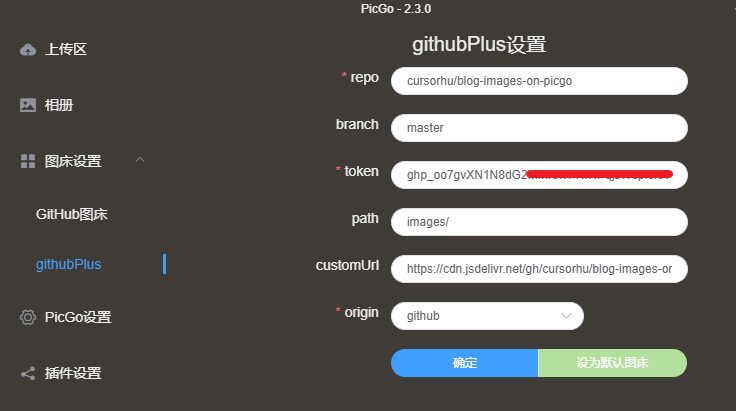
image-20240423135401997

如何删除Github图床的图片:
PicGo默认的Github图床不能通过相册删除github仓库的图片,需要使用第三方插件github-plus,建议作为默认图床工具,支持相册删除同步到github仓库:

Obsidian配置指南

Obsidian图床自动上传

流程参考# 在Obsidian中使用图床实现“一次上传、多次搬运”省心又省力

重点部分:配置自动上传插件。写Markdown文章时粘贴的图片自动上传到Github+PicGo图床,无需手动上传和写链接

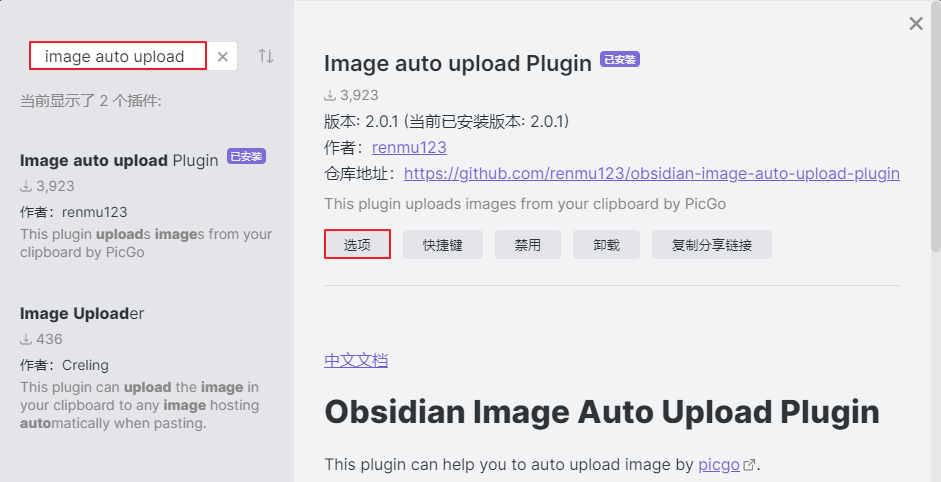
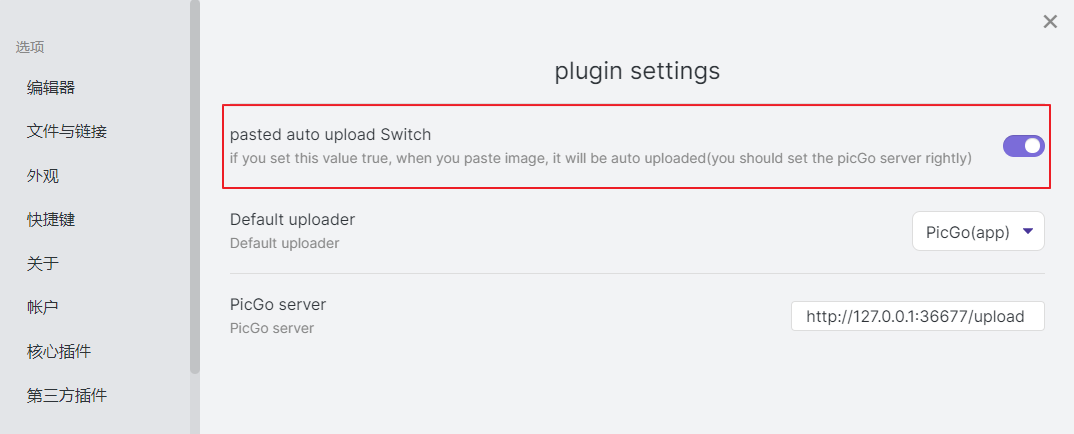
可以看到,此插件相当于一个PicGo客户端,而本地运行的PicGo Server已开启端口36677的监听。

单元测试:
以上配置好后,Obsidian新建一个Markdown文档,粘贴图片会显示updating… ,成功后可在github图床仓库看到该图片,且Markdown本地预览也可以看到。

遇到的坑:
一开始上传的图片,github可预览,Obsidian预览失败
在PicGo客户端查看刚才上传图片预览也不正常,PicGo客户端手动上传一张后才正常预览。
此后Obsidian再粘贴上传图片,预览正常。
可能是PicGo首次链接Obsidian插件的bug。

实时预览和标题大纲

实时预览是你写一句Markdown,自动转换成预览格式,而不显示Markdown源码。这样不需要开两个窗口,一个写源码一个看预览。在设置->编辑器里开启。

标题大纲是侧边栏显示文章标题列表,就像word的导航窗口一样。在设置-核心插件开启。

Typora配置指南

typora beta安装

typora-0-11-18是最后一个windows免费版,windows上安装需要额外配置如下:

win+R, regedit, 在计算机\HKEY_CURRENT_USER\SOFTWARE\Typora文件夹右键权限,选择当前windows登录用户,在拒绝列,勾选全部拒绝。

原理是禁止typora beta访问系统时间,避免弹窗。
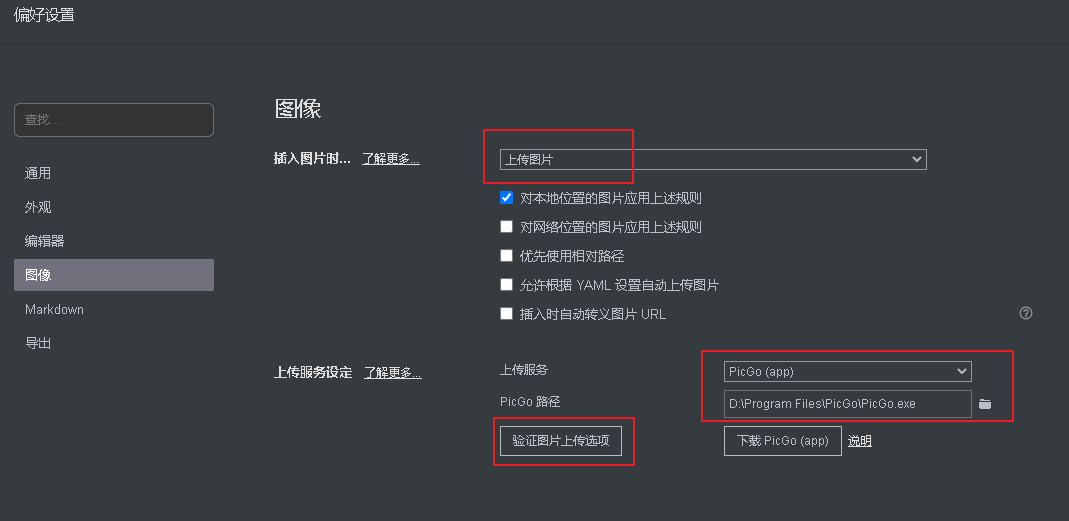
typora图床自动上传

自动标题编号

设置typora标题、目录、大纲自动编号

typora->偏好设置->外观->主题文件夹->创建“base.user.css”配置代码

配置代码见附录。这个配置是从二级标题开始,一级标题不编号。一级标题一般就是文章标题,写在Markdown最前面,文章内的二级标题是各章节大标题。使用此配置时注意:至少要有一个一级标题,否则二级标题编号是0.X

Markdown高效写作

Markdown快捷键

Typora和Obsidian都可以配置快捷键。我习惯的自定义Markdown快捷键设置如下。

代码 Ctrl+`

代码块 Ctrl+Alt+`

无序列表 Ctrl + U (Un-Ordered)
插入链接 Ctrl + L (Link)

加粗 Ctrl + B (Bold)
斜体 Ctrl + I (Italian体)
引用 Ctrl + Q (Quote)
插入图片 Ctrl + G (Graph, 有了“粘贴即上传”后这个实际上用不上)

其他就保持默认,例如表格,删除线,分割线等等。也可以参考VS Code的Markdown插件设置。

Typora设置方法:设置->通用->打开高级设置->打开conf.user.json,路径在C:\Users\用户\AppData\Roaming\Typora\conf

在KeyBinding设置key-value,其中key是typora菜单的选项,value是快捷键值。typora默认的快捷键已经够好用,这里只作为个人示例:

1
2
3
4
5
6
7
8
9
"keyBinding": {
// for example:
// "Always on Top": "Ctrl+Shift+P"
// All other options are the menu items 'text label' displayed from each typora menu
"代码": "Ctrl+`",
"代码块": "Ctrl+Alt+`",
"无序列表": "Ctrl+u",
"有序列表": "Ctrl+o"
},

默认的代码块Ctrl+Shift+K失效可能是因为快捷键被占用,可以使用Ark工具查找,参考: https://blog.csdn.net/lpwmm/article/details/108451728

搭建hexo博客环境

环境安装

整体流程参考:# 个人博客第5篇——安装node.js和Hexo
官方文档参考:hexo.io

部署命令如下:

1
2
3
4
5
6
7
8
C:\Users\cursorhu>npm install -g hexo-cli #npm安装hexo包
C:\Users\cursorhu>d: #切到以后写blog的目录
D:\hexo-blog>hexo init #下载hexo
INFO Cloning hexo-starter https://github.com/hexojs/hexo-starter.git
D:\hexo-blog>hexo g #将blog资料创建为css,html静态文件
INFO Generated: archives/index.html
D:\hexo-blog>hexo s #运行hexo server
INFO Hexo is running at http://localhost:4000/ . Press Ctrl+C to stop.

博客的github仓库,主题等关键配置都在hexo init对应目录下的_config.yml
修改几个关键配置如下:
博客框架的语言一定要配,否则默认德语阿拉伯语…
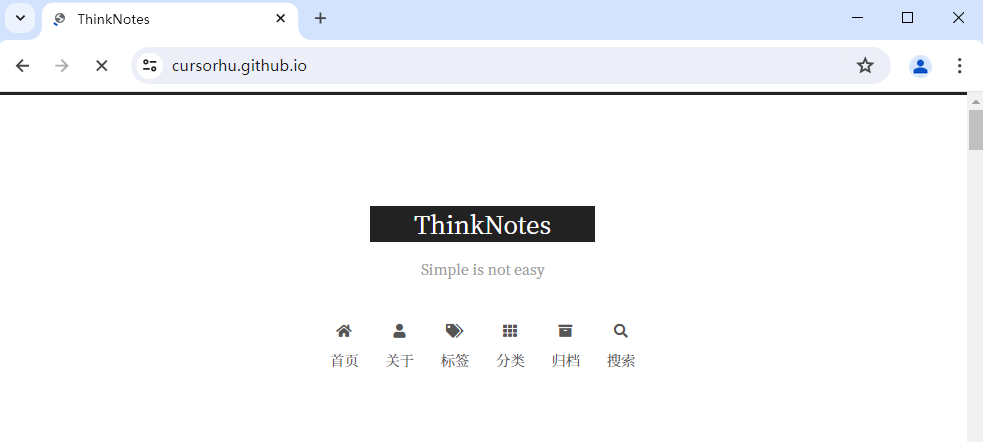
title: ThinkNotes
subtitle: Simple is not easy
author: Cursorhu
language: zh-CN

Github部署配置

url: https://cursorhu.github.io
deploy:
type: git
repo: https://github.com/cursorhu/cursorhu.github.io
branch: master

简单总结一下:

  • hexo是一个基于nodeJS的博客框架,nodeJS提供JavaScript实现后端服务的能力。
  • hexo可以将本地写好的Markdown文本和图片资源,以JavaScript网页资源的方式打包。hexo可以在本机运行服务,通过浏览器可以在网页访问。
  • 如果要使博客外网可访问,需要一个云服务存放hexo生成的博客,我们使用github仓库作为博客云端。前面已经搭建了github图床仓库,因此图片并不需要放到此hexo仓库。
  • 使用git实现hexo博客部署到github仓库

安装hexo遇到的坑:
如果你以前用过hexo,之后nodeJS升级了版本,一定不要用以前的hexo博客目录,必须新建博客目录,重新hexo init安装相关hexo插件。否则nodeJS和hexo插件可能不兼容导致部署失败。

hexo插件版本是根据nodeJS版本自动安装的,配置文件是package.json。以nodeJS 16.3为例,自动生成的依赖版本如下:

1
2
3
4
5
6
7
8
9
10
11
12
13
14
15
16
17
18
19
20
21
22
23
24
25
26
27
{
"name": "hexo-site",
"version": "0.0.0",
"private": true,
"scripts": {
"build": "hexo generate",
"clean": "hexo clean",
"deploy": "hexo deploy",
"server": "hexo server"
},
"hexo": {
"version": "6.0.0"
},
"dependencies": {
"hexo": "^6.0.0",
"hexo-deployer-git": "^3.0.0",
"hexo-generator-archive": "^1.0.0",
"hexo-generator-category": "^1.0.0",
"hexo-generator-index": "^2.0.0",
"hexo-generator-tag": "^1.0.0",
"hexo-renderer-ejs": "^2.0.0",
"hexo-renderer-marked": "^5.0.0",
"hexo-renderer-stylus": "^2.0.0",
"hexo-server": "^3.0.0",
"hexo-theme-landscape": "^0.0.3"
}
}

发布博客

hexo new命令可以从0新建markdown写博客,一般不用这么麻烦。

我们直接将写好的Markdown(图片资源是图床链接)放到hexo博客目录的post文件夹,例如我的本地目录是:

F:\HexoBlog\source_posts

在Markdown文件前添加hexo博客特有的头,说明博客的标题时间,分类等属性。这个头如果用hexo new命令会自动生成,可以先new一个然后拷过来。

title: 博客文章名
date: 2022-02-28 15:04:18
tags: markdown
categories: markdown

最后使用git生成网页文件并发布到github博客仓库, 注意不是用node命令行!
在hexo博客目录下运行:

1
2
3
hexo clean   #清除缓存文件 db.json 和已生成的静态文件 public
hexo g #生成网站静态文件到默认设置的 public 文件夹(hexo generate 的缩写)
hexo d #自动生成网站静态文件,并部署到设定的仓库(hexo deploy 的缩写)

博客主题

博客主题(theme)取决于不同人喜好,github有大量的hexo主题,按需配置
推荐几个主流的:
Next
hexo-theme-material

以Next主题为例,安装:

$ cd hexo博客目录
$ git clone https://github.com/theme-next/hexo-theme-next themes/next

已我的配置为例,就会在F:\HexoBlog\themes\next看到next主题的源码和配置文件config.yml

Next配置可以自定义各种设置,例如子主题:

scheme: Muse
#scheme: Mist
#scheme: Pisces
#scheme: Gemini

我们前面已经用jsdelivr开源CDN为PicGo上传图片加速,可以配置Next主题的网页静态文件的相关库也用jsdelivr加速。最好用到才开启,例如motion enable, 其依赖库velocity就可以设置jsdelivr加速:

motion:
enable: true
velocity: //cdn.jsdelivr.net/npm/velocity-animate@1/velocity.min.js
velocity_ui: //cdn.jsdelivr.net/npm/velocity-animate@1/velocity.ui.min.js

注意这些配置文件也是Markdown格式,# 注释一定要带空格

hexo要使用next, 在hexo配置文件设置:

theme: next

hexo clean, hexo g, hexo s 跑本地服务,看一下效果:

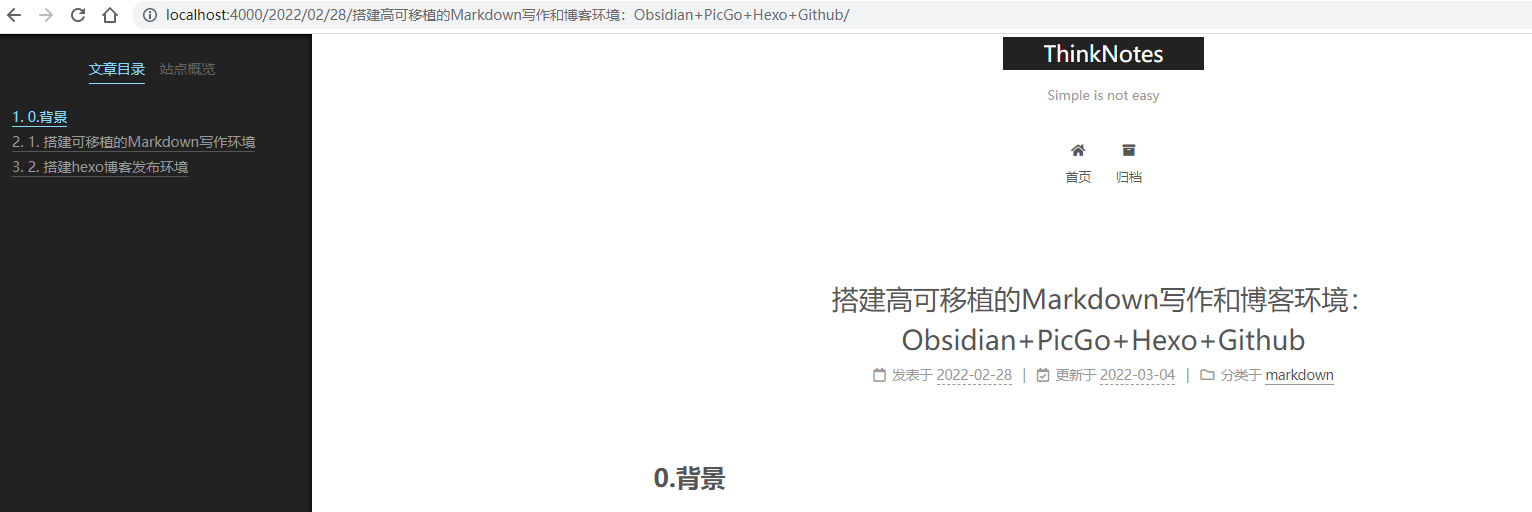
最后hexo clean, g, d 命令三连部署到github

访问https://cursorhu.github.io/

image-20240423155947426

附录:typora自动编号代码

手动创建的base.user.css路径:

C:\Users\用户名\AppData\Roaming\Typora\themes\base.user.css

1
2
3
4
5
6
7
8
9
10
11
12
13
14
15
16
17
18
19
20
21
22
23
24
25
26
27
28
29
30
31
32
33
34
35
36
37
38
39
40
41
42
43
44
45
46
47
48
49
50
51
52
53
54
55
56
57
58
59
60
61
62
63
64
65
66
67
68
69
70
71
72
73
74
75
76
77
78
79
80
81
82
83
84
85
86
87
88
89
90
91
92
93
94
95
96
97
98
99
100
101
102
103
104
105
106
107
108
109
110
111
112
113
114
115
116
117
118
119
120
121
122
123
124
125
126
127
128
129
130
131
132
133
134
135
136
137
138
139
140
141
142
143
144
145
146
147
148
149
150
151
152
153
154
155
156
157
158
159
160
161
162
163
164
165
166
167
168
169
170
171
172
173
174
175
176
177
178
179
180
181
182
183
184
185
186
187
188
189
190
191
192
193
194
195
196
197
198
199
200
201
202
203
204
205
206
207
208
209
210
211
212
/*文章内容自动编号*/
/** initialize css counter */
h1 {
counter-reset: h2
}

h2 {
counter-reset: h3
}

h3 {
counter-reset: h4
}

h4 {
counter-reset: h5
}

h5 {
counter-reset: h6
}

/** put counter result into headings */
#write h2:before {
counter-increment: h2;
content: counter(h2) ". "
}

#write h3:before,
h3.md-focus.md-heading:before /** override the default style for focused headings */ {
counter-increment: h3;
content: counter(h2) "." counter(h3) ". "
}

#write h4:before,
h4.md-focus.md-heading:before {
counter-increment: h4;
content: counter(h2) "." counter(h3) "." counter(h4) ". "
}

#write h5:before,
h5.md-focus.md-heading:before {
counter-increment: h5;
content: counter(h2) "." counter(h3) "." counter(h4) "." counter(h5) ". "
}

#write h6:before,
h6.md-focus.md-heading:before {
counter-increment: h6;
content: counter(h2) "." counter(h3) "." counter(h4) "." counter(h5) "." counter(h6) ". "
}

/** override the default style for focused headings */
#write>h3.md-focus:before,
#write>h4.md-focus:before,
#write>h5.md-focus:before,
#write>h6.md-focus:before,
h3.md-focus:before,
h4.md-focus:before,
h5.md-focus:before,
h6.md-focus:before {
color: inherit;
border: inherit;
border-radius: inherit;
position: inherit;
left:initial;
float: none;
top:initial;
font-size: inherit;
padding-left: inherit;
padding-right: inherit;
vertical-align: inherit;
font-weight: inherit;
line-height: inherit;
}

/*文章主题自动编号*/
/* No link underlines in TOC */
.md-toc-inner {
text-decoration: none;
}

.md-toc-h1 {
margin-left: 0;
font-size: 1.5rem;
counter-reset: h2toc
}

.md-toc-h2 {
font-size: 1.1rem;
margin-left: 2rem;
counter-reset: h3toc
}

.md-toc-h3 {
margin-left: 3rem;
font-size: .9rem;
counter-reset: h4toc
}

.md-toc-h4 {
margin-left: 4rem;
font-size: .85rem;
counter-reset: h5toc
}

.md-toc-h5 {
margin-left: 5rem;
font-size: .8rem;
counter-reset: h6toc
}

.md-toc-h6 {
margin-left: 6rem;
font-size: .75rem;
}

.md-toc-h2:before {
color: black;
counter-increment: h2toc;
content: counter(h2toc) ". "
}

.md-toc-h2 .md-toc-inner {
margin-left: 0;
}

.md-toc-h3:before {
color: black;
counter-increment: h3toc;
content: counter(h2toc) ". " counter(h3toc) ". "
}

.md-toc-h3 .md-toc-inner {
margin-left: 0;
}

.md-toc-h4:before {
color: black;
counter-increment: h4toc;
content: counter(h2toc) ". " counter(h3toc) ". " counter(h4toc) ". "
}

.md-toc-h4 .md-toc-inner {
margin-left: 0;
}

.md-toc-h5:before {
color: black;
counter-increment: h5toc;
content: counter(h2toc) ". " counter(h3toc) ". " counter(h4toc) ". " counter(h5toc) ". "
}

.md-toc-h5 .md-toc-inner {
margin-left: 0;
}

.md-toc-h6:before {
color: black;
counter-increment: h6toc;
content: counter(h2toc) ". " counter(h3toc) ". " counter(h4toc) ". " counter(h5toc) ". " counter(h6toc) ". "
}

.md-toc-h6 .md-toc-inner {
margin-left: 0;
}

/*文章大纲自动编号*/
.outline-h1 {
counter-reset: h2
}

.outline-h2 {
counter-reset: h3
}

.outline-h3 {
counter-reset: h4
}

.outline-h4 {
counter-reset: h5
}

.outline-h5 {
counter-reset: h6
}

.outline-h2>.outline-item>.outline-label:before {
counter-increment: h2;
content: counter(h2) ". "
}

.outline-h3>.outline-item>.outline-label:before {
counter-increment: h3;
content: counter(h2) "." counter(h3) ". "
}

.outline-h4>.outline-item>.outline-label:before {
counter-increment: h4;
content: counter(h2) "." counter(h3) "." counter(h4) ". "
}

.outline-h5>.outline-item>.outline-label:before {
counter-increment: h5;
content: counter(h2) "." counter(h3) "." counter(h4) "." counter(h5) ". "
}

.outline-h6>.outline-item>.outline-label:before {
counter-increment: h6;
content: counter(h2) "." counter(h3) "." counter(h4) "." counter(h5) "." counter(h6) ". "
}