Windows Driver - Visual Studio配置
安装VisualStudio+SDK+WDK环境
全部流程:https://learn.microsoft.com/zh-cn/windows-hardware/drivers/download-the-wdk
注意:WDK安装前要求先安装适配版本的SDK:
https://developer.microsoft.com/en-us/windows/downloads/windows-sdk/
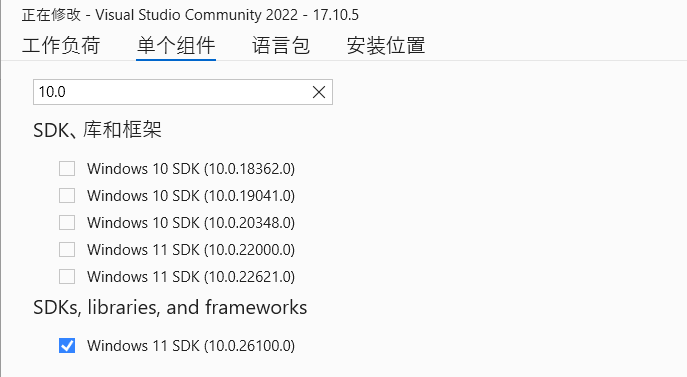
推荐按以上链接在VS安装程序中安装Windows 11 SDK (10.0.26100.0),注意默认选中的不是这个版本,需要手动选择这个版本:
正常安装完SDK和WDK后,创建一个KMDF项目是像这样:如果缺少SDK和Driver Setting这些,说明SDK版本不匹配
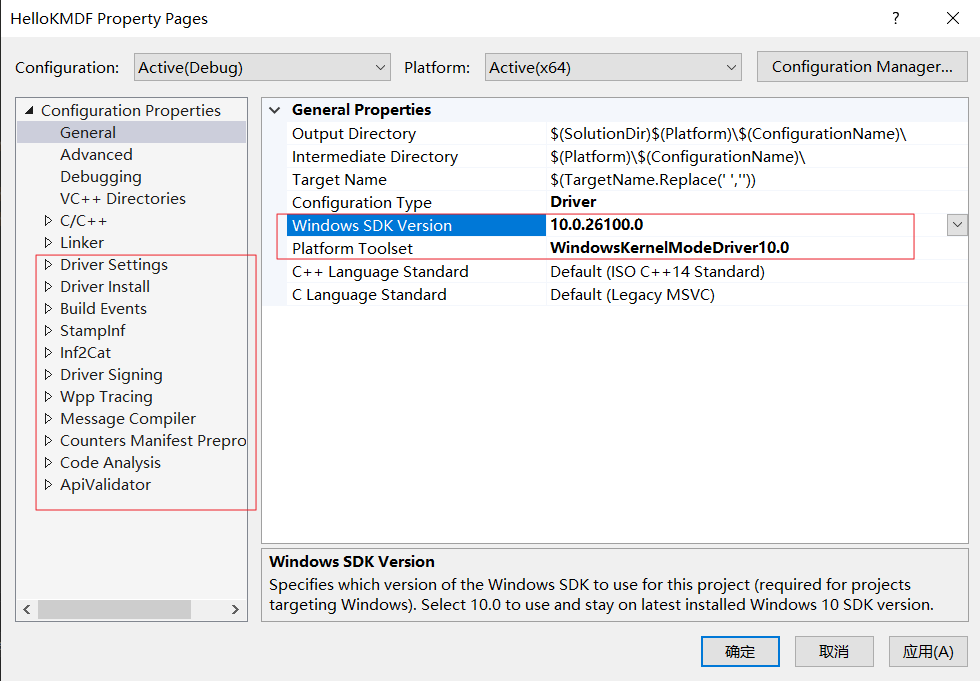
注意:如果在有问题的环境创建了项目编译会报错,在环境配好后该项目也不能用还是会编译报错,应该删除重新建。
VS2019+SDK+WDK环境
TODO
搭建DVL环境(for WHQL)
前置环境:Visual Studio 2019 + SDK 22000 + WDK 22000 + 一些MSVC模块
(Visual Studio 2022 + 24H2 WDK无法正常执行CodeQL(找不到x86\InfVerif.dll),也没有自带SDV,暂时不用VS2022环境)
DVL:driver verification log
The Windows Hardware Certification Program requires a driver verification log (DVL) for driver submissions. The DVL contains a summary of the results from static analysis tools, CodeQL. The DVL doesn’t contain any source code information. Before creating a DVL for your driver, run CodeQL, the code analysis tool, and static driver verifier.
使用VS2019+WDK,WHQL的DVL生成依赖于三项文件: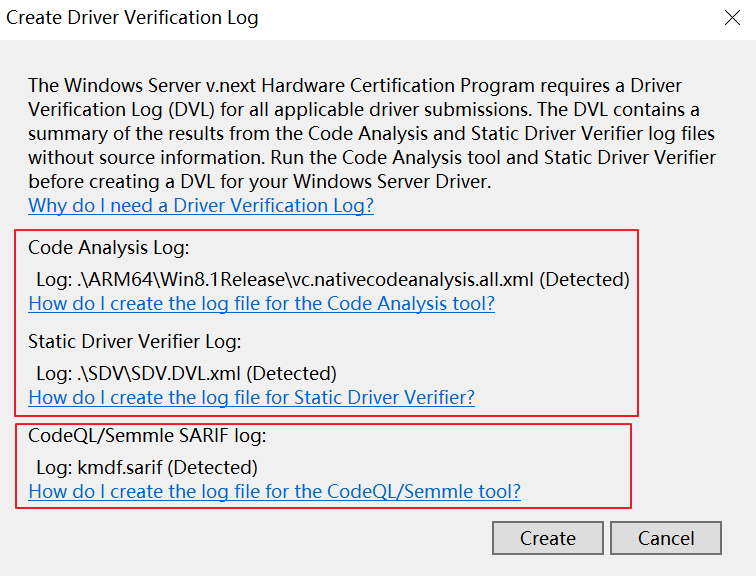
- Code Analysis(CA) log: VS2019 + WDK 环境可以生成
- Static Driver Verifier(SDV) log:VS2019 + WDK 环境可以生成
- CodeQL Sarif log:需要配置CodeQL环境
根据微软的SDV文档(https://learn.microsoft.com/en-us/windows-hardware/drivers/devtest/static-driver-verifier):CodeQL 和SDV似乎是并列关系,都是静态代码分析,因此VS 2022直接不支持SDV,只推荐CodeQL。但不确定WHQL logo driver是不是必须要SDV,因此还是用VS2019环境以确保DVL需要的三种log都能生成。
配置CodeQL环境
https://github.com/microsoft/Windows-Driver-Developer-Supplemental-Tools
WHQL的OS版本对CodeQL版本的兼容矩阵表:
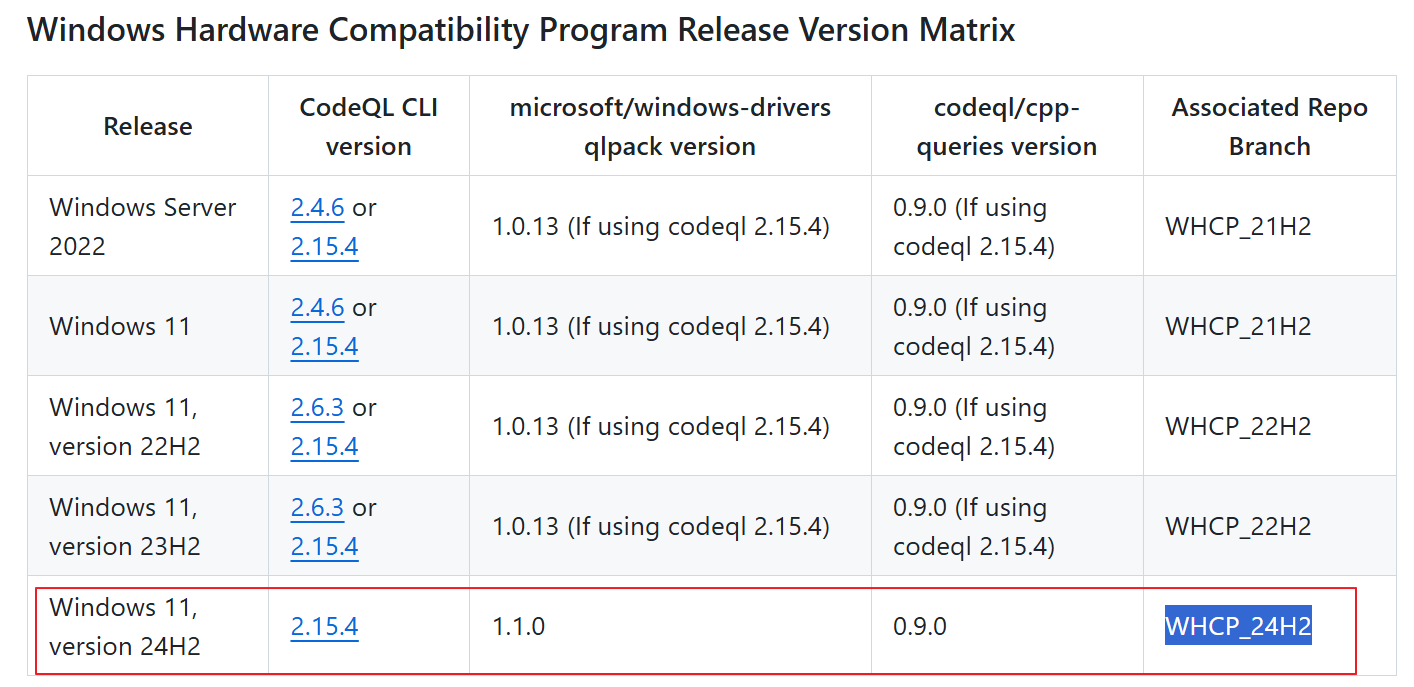
假如要发布24H2的WHQL driver,需要选用红框的版本。按以下几步配置CodeQL环境:
创建CodeQL环境的home目录:
1 | C:\> mkdir C:\codeql-home |
- 下载CodeQL 2.15.4 二进制包
https://github.com/github/codeql-cli-binaries/releases/tag/v2.15.4
下载Windows Driver Developer Supplemental Tools的WHCP_24H2分支;或者git clone,再checkout到WHCP_24H2
1
2
3
4
5
6
7
8
9
10
(1)下载Windows Driver Developer Supplemental Tools的WHCP_24H2分支:
git clone https://github.com/microsoft/Windows-Driver-Developer-Supplemental-Tools.git
git branch -a
git checkout WHCP_24H2
也可以在github页面切换到WHCP_24H2分支后下载压缩包
(2)查看分支:
C:\codeql-home\Windows-Driver-Developer-Supplemental-Tools>git branch
* WHCP_24H2
main注意,不同的分支可能对应不同的windows_driver_mustfix.qls
安装CodeQL query packages
如果不安装CodeQL query packages,直接执行codeql analyze会报package缺失,目前我是手动安装package:VS rebuild多次执行后处理脚本RunCodeQLRebuildQuery.bat,每次报错缺什么版本package就装什么,如下图,直到不再报错。
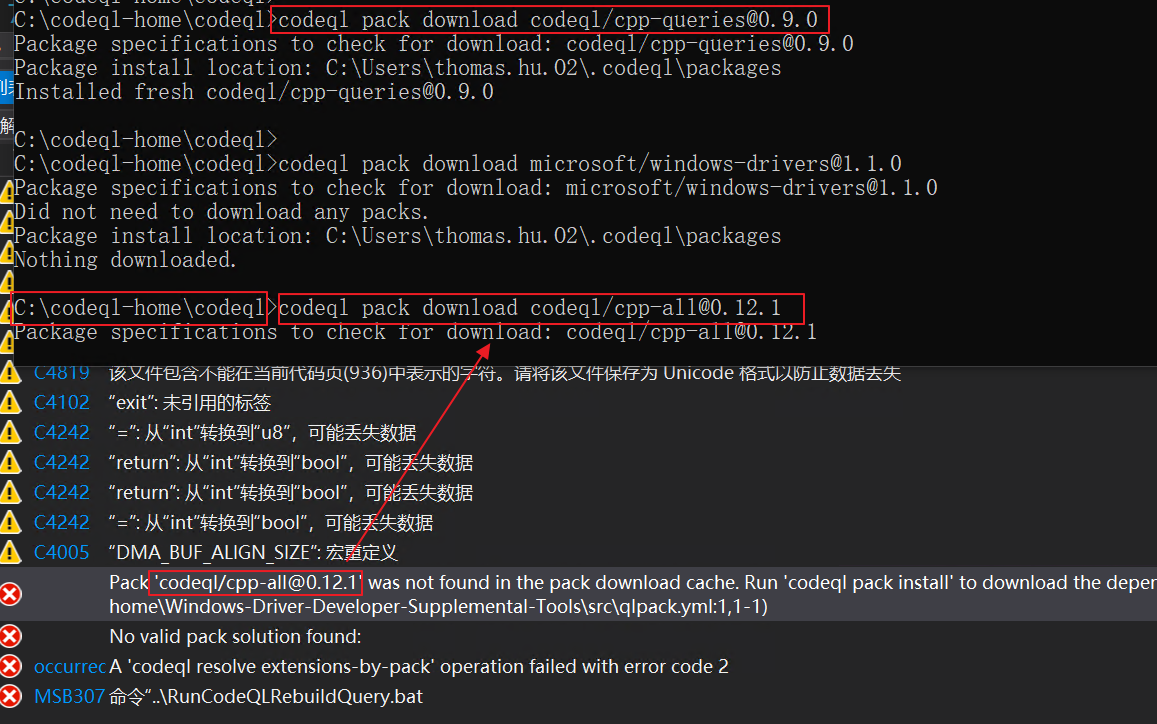
安装单个query packages方法:在C:\codeql-home\codeql目录下(包含codeql.exe),执行
1
codeql pack download <package>@<version>
安装所有依赖的query packages过程如下(仅针对CodeQL 2.15.4):
1 | Package specifications to check for download: codeql/cpp-queries@0.9.0 |
有时候网络不好下载失败,换个时间多次重试直到安装成功
1 | C:\codeql-home\codeql>codeql pack download codeql/cpp-queries@0.9.0 |
CodeQL生成.sarif
(1) 使用.BAT(参考 https://learn.microsoft.com/en-us/windows-hardware/drivers/devtest/static-tools-and-codeql#queries-and-suites 7. Visual Studio Post-Build Event (Optional))
(2) RunCodeQLRebuildQuery.bat内容如下:
功能:在C:\codeql-home创建空目录databases,再执行codeql create database和codeql analyze database,其中codeql analyze database依赖于前面的CodeQL query packages和Windows Driver Developer Supplemental Tools。最后输出kmdf.sarif。
1 | ECHO ">>> Running CodeQL Security Rule V 1.0 <<<" |
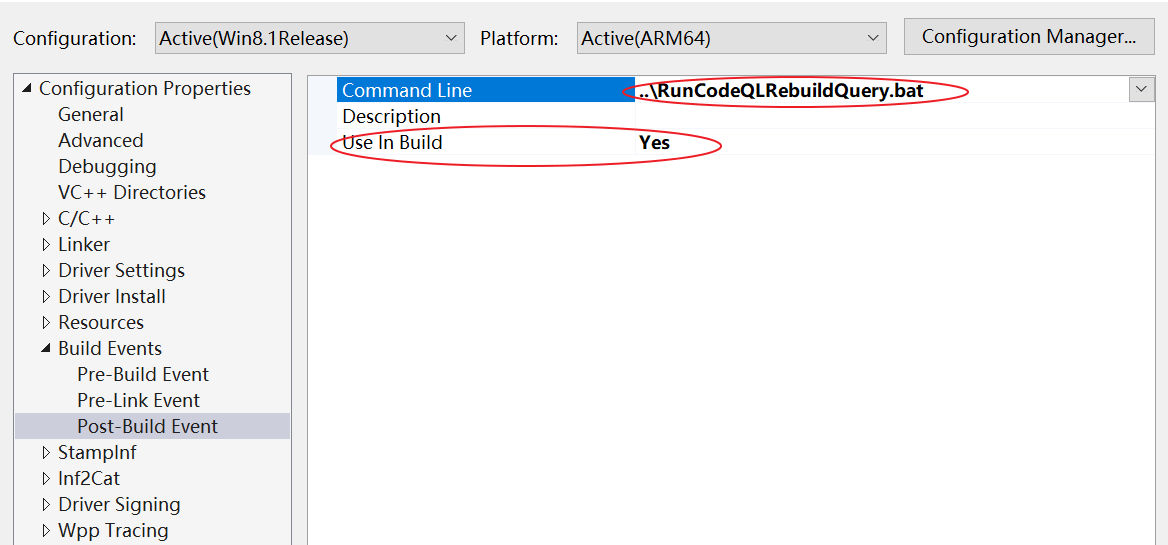
(3) 设置项目后处理脚本为RunCodeQLRebuildQuery.bat,并使能,如下图:
这个示例RunCodeQLRebuildQuery.bat位置是.vcxproj的上级目录,也可以放同级目录,不需要加..\
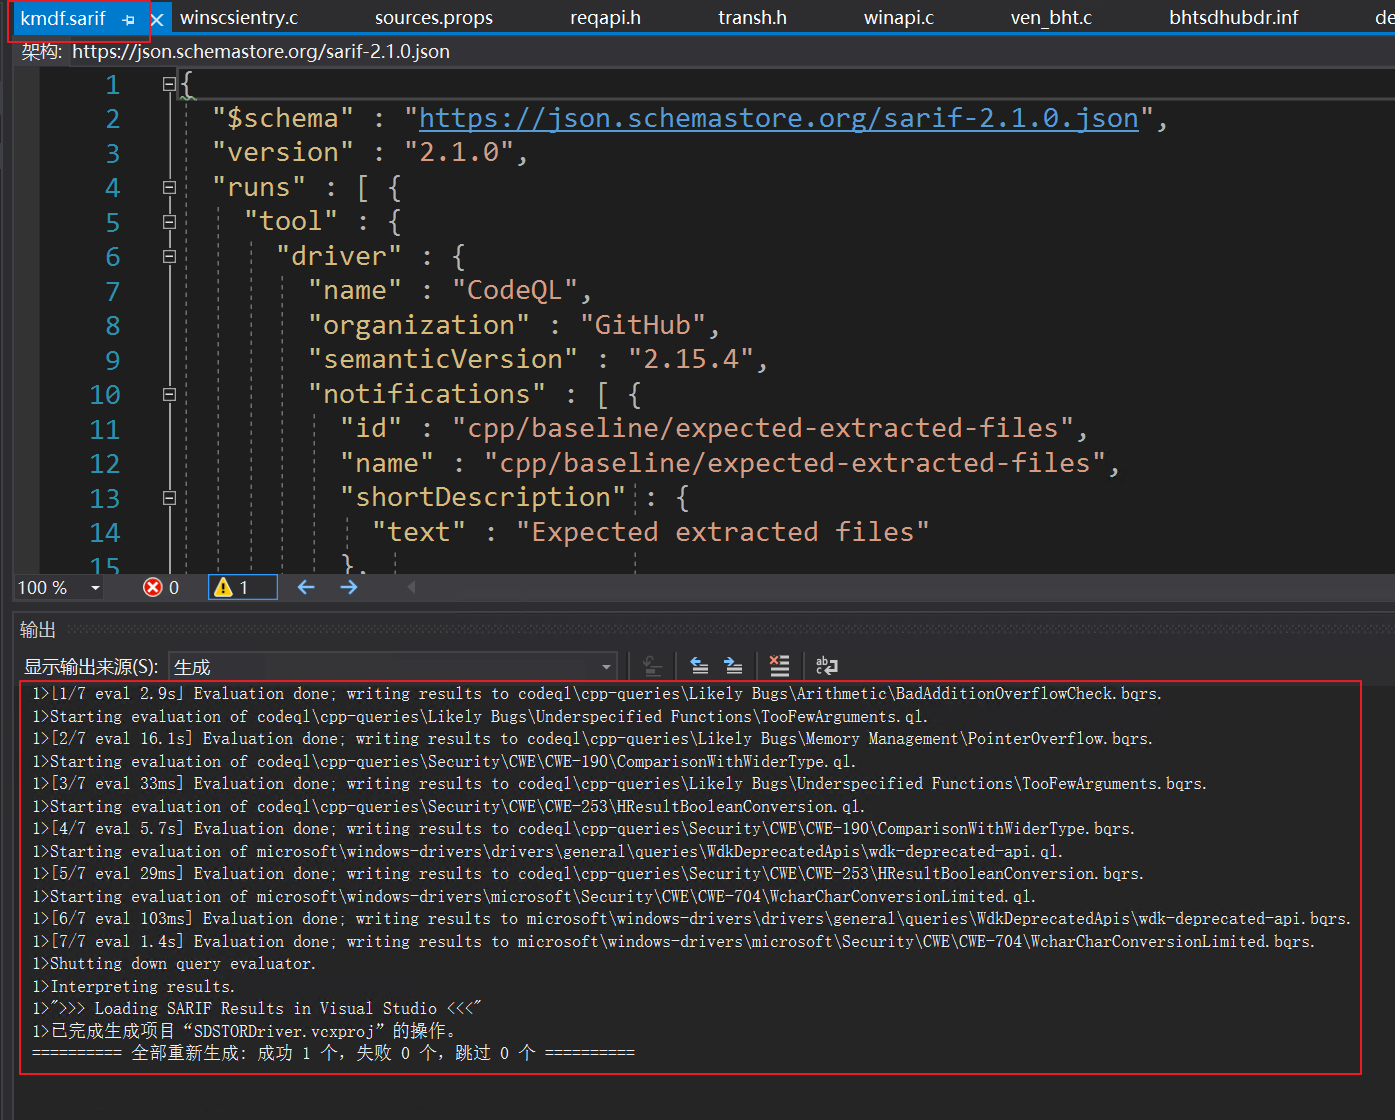
(4)运行项目rebuild,编译后会运行RunCodeQLRebuildQuery.bat,正常结果显示success,并能看到kmdf.sarif文件,如下图。如果有错一般是前面的query依赖库没装好,或者VS+WDK版本不兼容。
(5) 最后将C:\codeql-home\databases\kmdf.sarif拷贝到Driver的vcproj目录,后面的DVL生成会用到。
(6) RunCodeQLRebuildQuery.bat的调试经验:
如果找不到msbuild,需要将msbuild.exe的路径加到系统PATH,例如(D:\Program Files\Microsoft Visual Studio\2019\Community\MSBuild\Current\Bin)
中文系统上执行msbuild可能输出乱码,CMD中设置中文编码支持:
1 | chcp 65001 |
运行SDV和Code Analysis,生成DVL
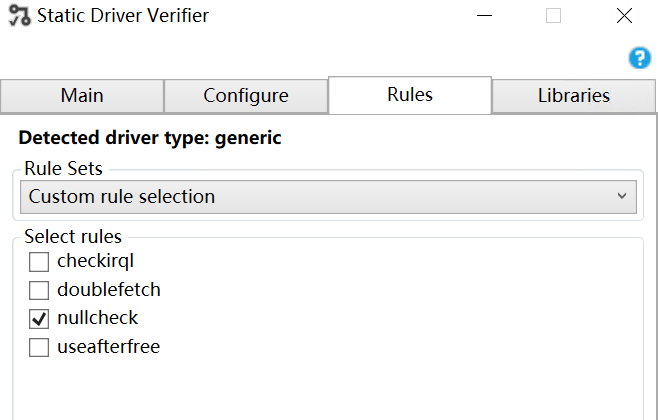
(1)生成SDV:VS2019 + WDK 22000安装后自带SDV(Static Driver Verifier)
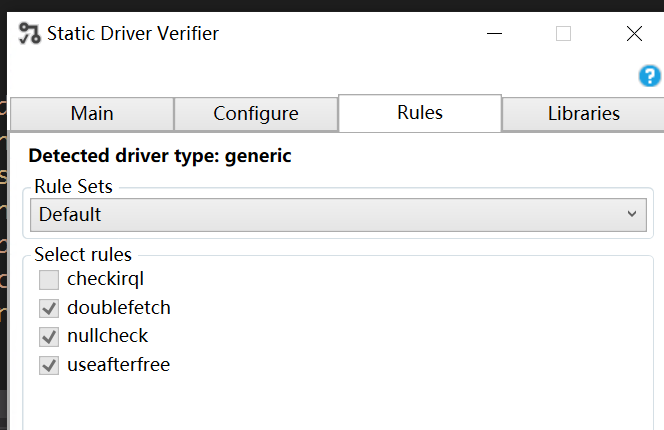
VS2019 -> Extension -> Driver -> Launch Static Driver Verifier
默认选择must fix项,但WHQL的HLK并不需要测所有,也不要求测试项必须通过,因此也可以选择default,或者自定义只测一项nullcheck。
(2)生成CA:VS2019 -> Analyze -> Run code analysis -> Run code analysis on bhtsddr
(3)生成kmdf.sarif:已在项目目录下
(4)生成DVL:VS2019 -> Extension -> Driver -> Create driver verification log
显示三种依赖log都detected,Create有警告无所谓,在项目目录下有DriverName.DVL.XML文件生成

DVL示例内容如下(SDV和CA有fail,但不影响WHQL HLK)
1 | <Data> |
WHQL的HLK测试会用到此DVL文件。
代码新项目相关的配置
VisualStudio新项目环境配置
使用VSCode快捷键
工具–>选项->键盘->键盘映射方案选VSCode
WDF项目找不到头文件问题
- 找不到<ntddk.h>和<wdf.h>
在项目配置-> C/C++ -> General -> Additional Include Directories -> 加上WDK和WDF的include头文件路径
Ntddk.h contains core Windows kernel definitions for all drivers, while Wdf.h
contains definitions for drivers based on the Windows Driver Framework (WDF).
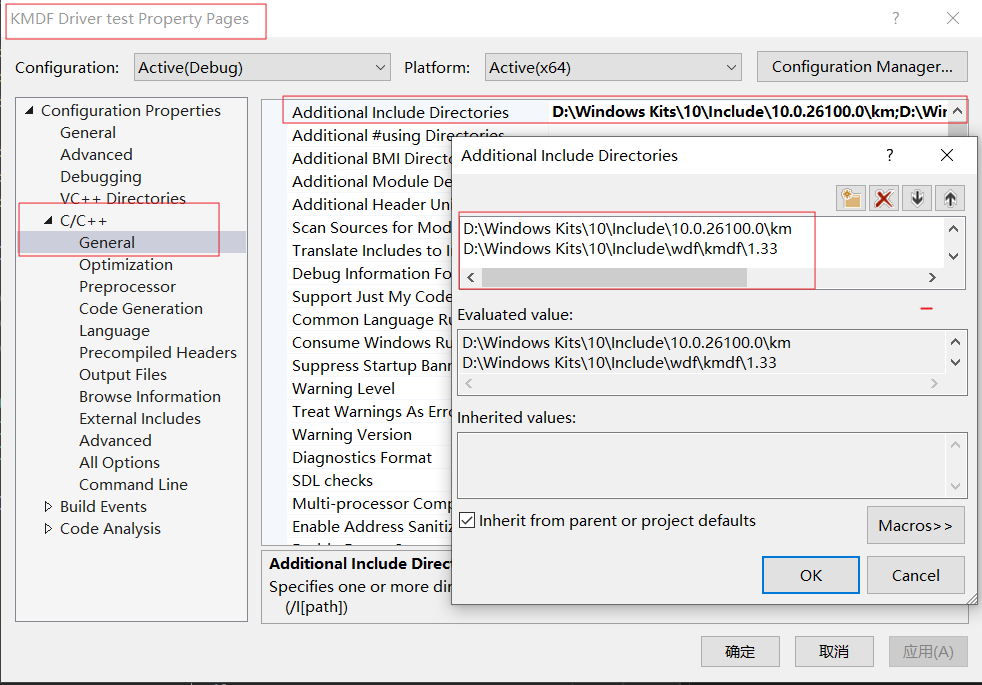
注意WDF的版本,Win11选WDF 1.33,参考:https://learn.microsoft.com/zh-cn/windows-hardware/drivers/wdf/kmdf-version-history
- 找不到device.tmh
项目设置 -> WPP Tracing -> 设置 “Run Wpp Tracing” 为 YES
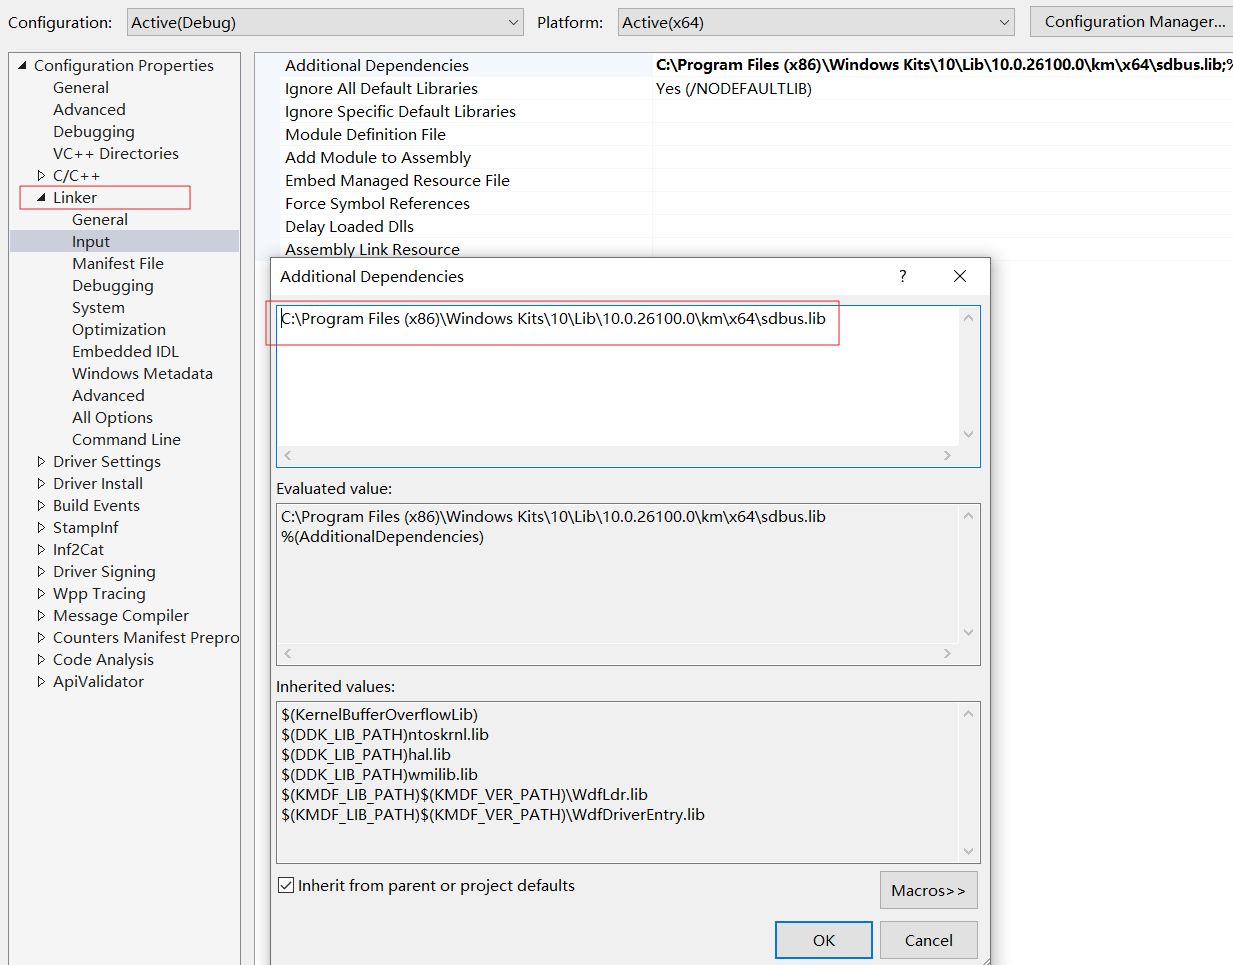
WDF项目找不到链接symbol
如果是调用第三方库API报此问题,基本上是项目配置没有链接这个库
The object file or library that contains the definition of the symbol isn’t linked
以SDBUS驱动为例,ntddsd.h定义的SdBusSubmitRequest只有declaration,其函数体实现其实是在SDBUS.lib里,用everything搜索此lib(WDK路径),加到项目配置的Link dependence lib(Link -> Input -> Additional Dependence),即可编译通过。
The ntddsd.h header file, which is provided in the Windows Driver Kit (WDK), declares the prototypes for the routines exposed by the SD bus library.
https://learn.microsoft.com/en-us/windows-hardware/drivers/sd/sd-card-driver-stack
另外一个示例:
RtlStringCbVPrintfA打印函数属于ntstrsafe.h定义,其lib同名,位于WDK的km目录;一般WDF驱动把km和kmdf的.lib都加到项目的linker路径:(Link -> Input -> Additional Dependence)
注意需要指定到.lib文件名,一般是用到哪个lib才链接哪个lib;
1 | C:\Program Files (x86)\Windows Kits\10\Lib\10.0.26100.0\km\x64\ntstrsafe.lib |
也可以用*匹配所有lib:
1 | C:\Program Files (x86)\Windows Kits\10\Lib\10.0.26100.0\km\x64\*.lib |
VS Code配置项目包含WDF/WDM头文件
在.vscode的c_cpp_properties.json添加WDF/WDM所在的头文件定义(即前面VisualStudio添加的Additional Include Directories),在WDK目录,用everything搜索wdf.h和wdm.h所在的目录:
1 | "includePath": [ |
注意上图windows路径需要将单斜杠全局替换成双斜杠,空格不需要加反斜杠
替换完毕查看是否能跳转,例如单击WdfIoQueueCreate能跳转到wdfio.h的函数体定义:
1 | _Must_inspect_result_ |
代码中支持中文编码
Warning C4819 The file contains a character that cannot be represented in the current code page (936). Save the file in Unicode format to prevent data loss
这个警告是关于代码页(code page)编码的问题。警告 C4819 表示文件中包含无法在当前代码页(936,即GBK编码)中表示的字符。
解决这个问题有以下几种方法:
- 最推荐的方法是将文件保存为 UTF-8 with BOM 格式:
- 在 Visual Studio 中打开文件
- 点击”文件” -> “高级保存选项”
- 在编码下拉框中选择”UTF-8 with signature (Codepage 65001)”
- 点击保存
- 如果需要保持当前编码,可以在文件开头添加编码指示:
1 | #pragma code_page(65001) // 使用 UTF-8 编码 |
- 也可以在项目设置中修改:
- 右键项目 -> 属性
- C/C++ -> 命令行
- 在”其他选项”中添加
/utf-8
尝试过最有效的是方法3,但需要注意 Release和Debug的项目配置是独立的,需要配置两次/utf-8