Qualcomm HDK845开发环境
初始环境搭建(离线BSP包)
按SDM845(Open-Q 845 HDK) BSP v2.1 离线编译包中的README操作:
离线包约80GB,不需要翻墙下载android AOSP repo,只需要把Linux PC交叉编译环境搭好就能编译完整系统。
注意Linux系统必须使用Ubuntu18.04,其他版本有apt-get找不到包的问题。
本压缩包(Open-Q_845_Android-P_v2.1.offline.tar)在原厂BSP编译包(Open-Q_845_Android-P_v2.1.zip)的基础上包含了CAF源码库,可直接编译,无需再从外网下载代码库。
建议先阅读原厂文档中对应的Programmer’s Guide(PG), e.g., Intrinsyc Open-Q_845 Development Kit BSP Programmer Guide_v1.0.pdf.
本离线编译包涉及如下非原厂文件:
./bm_README.txt
本说明文档。Source_Package/bm_getSource.sh
该脚本为我们解压完原厂BSP编译包后运行的第一个脚本。它仅仅从CAF下载完代码库。Source_Package/bm_first_build.sh
该脚本将不再下载代码库,顺序执行:应用Patches, 解压专属代码/库,执行编译。 前两步需要且只能执行一次。Source_Package/bm_rebuild.sh
该脚本仅执行编译。
后三个文件,均为在原厂Source_Package/getSource_and_build.sh上简单修改而成。
如下步骤演示了如何使用本压缩包。
创建虚拟机(可选)
使用如下配置,在 Windows 10 上,使用 VMWare Workstation 创建一个Ubuntu 虚拟机。
1 | 内存: 不低于8GB |
虚拟机启动后,安装Ubuntu系统时,使用如下选项:
1 | 语言: English |
安装完,系统启动后,推荐参照如下步骤设置:
- 推荐设置更新源为本地更新源,比如
China下的mirrors.tuna.tsinghua.edu.cn - 推荐通过
What's new in Ubuntu引导界面,设置好Livepatch - 执行
sudo apt update; sudo apt upgrade -y后重启系统 - 完整安装VMWare Tools,包含共享目录功能,之后重启系统
配置开发环境
在重启后的Ubuntu中,创建一个内容为如下的脚本,e.g., prep.sh ,并执行它:
1 | echo ">> Updating system ..." |
之后,在终端中执行 source ~/.bashrc 来使 repo 命令生效。
下面,在VMWare Workstation 的虚拟机设置的 选项 -> 共享文件夹 中,将本离线包(Open-Q_845_Android-P_v2.1.offline.tar)所在的Windows目录 添加 到 文件夹(F)中。
这里假设该目录的 名称(N)为 WinDownloads。
之后,在终端中依次执行如下指令将离线包解压到Ubuntu系统中:
1 | mkdir ~/openq |
首次编译系统镜像
解压完后,请执行如下命令来进行首次编译:
1 | cd ~/openq/Open-Q_845_Android-P_v2.1/Source_Package/ |
首次编译会需 5~6 个小时,视Ubuntu硬件配置不同。编译成功后,终端会有如下build completed successfully字样的绿色输出,提示编译顺利结束:
1 | [100% 777/777] Target vbmeta image: out/target/product/sdm845/vbmeta.img |
新编译好的镜像位于 Source_Package/SDA845_Open-Q_845_Android-P_v2.1/out/target/product/sdm845 目录下。
后续可参考 PG 或 README.txt 中的说明来烧录新编译的镜像。
重新编译镜像
客户在自己定制系统镜像时,做完定制功能的代码修订后,请进入到Source_Package目录后执行./bm_rebuild.sh即可重新编译镜像。
选择性/部分/增量编译和烧录,请参见PG中的说明或原脚本。
请勿再执行./bm_first_build.sh脚本来重新编译镜像。
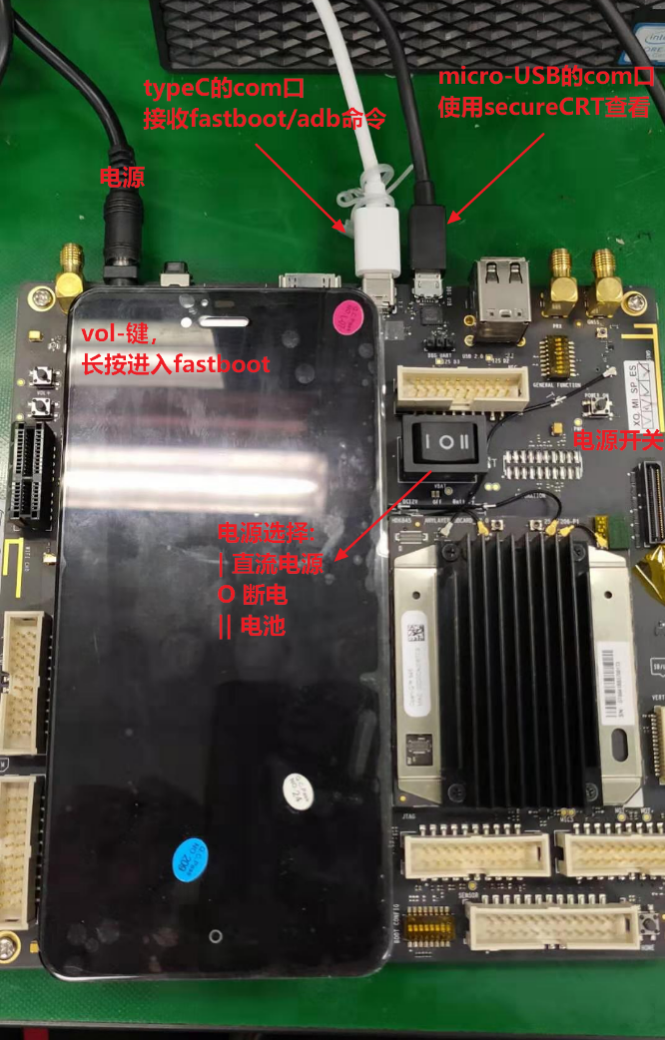
HDK845的镜像烧录
平台环境准备
开发板通过micro USB和type-C USB连接到主机
type-C: 用于开发板接收Adb/fastboot指令
micro USB:用于HOST PC接收开发板的输出打印
按键和连接如下:
使用ADB烧录镜像(Linux)
编译完需要用ADB USB-C烧录img镜像文件。
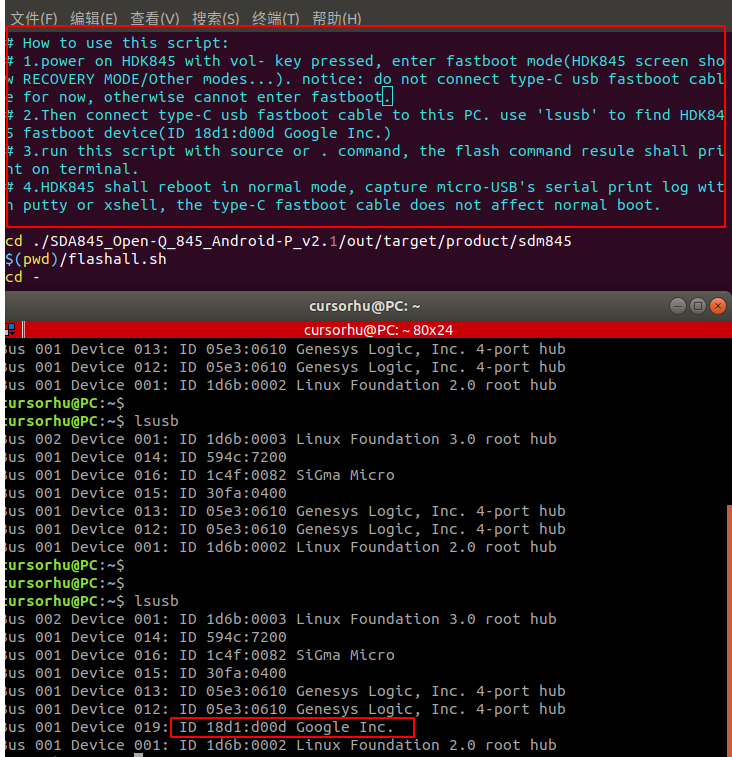
(1)设置Linux PC的ADB USB驱动,参考官方README 5.1 Setting up ADB in Linux。
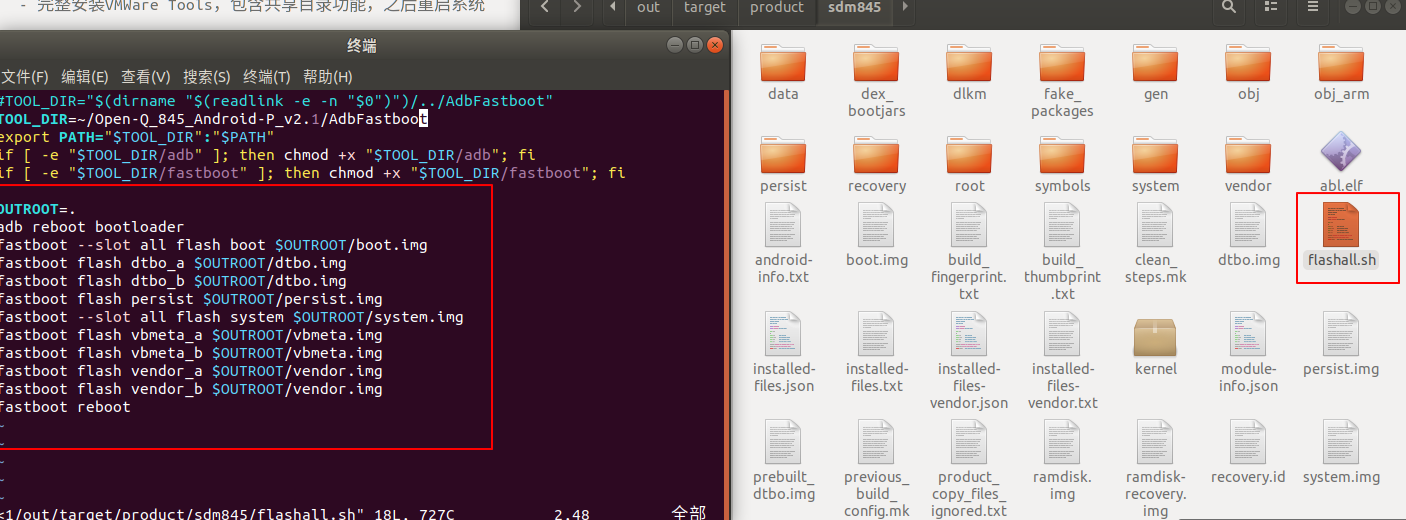
(2)正确调用flashall.sh执行烧录
为了一键编译和烧录,创建了flash_img.sh脚本。必须用source或 . 执行脚本否则pwd路径错误。
脚本记录了进fastboot模式的注意事项,必须先boot到fastboot模式,再插USB-C ADB线。
flash_img.sh:
1 | # How to use this script: |
烧录过充如下:
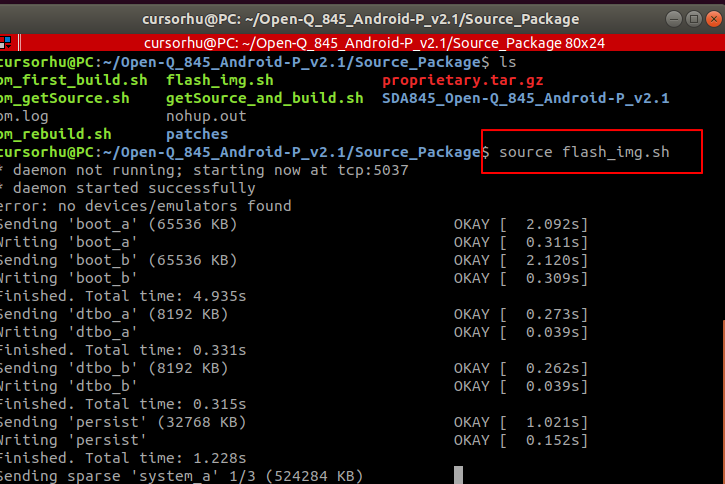
out目录flashall.sh的内容是执行当前目录下img的烧录,并重启
使用ADB烧录镜像(Windows)
使用Windows ADB USB驱动需要bcdedit打开测试模式才能装Windows ADB USB驱动,装完后设备管理器可看到ADB设备
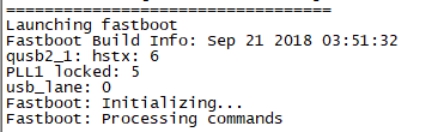
- 1 首先使开发版进入fastboot模式,连接micro USB,电源选项拨到DC电源, 上电后长按vol-, 然后连接type-C,串口打印出现Fastboot: Processing commands则进入fastboot。
- 2 win + R打开cmd,用fastboot烧写编译出来的镜像
```
fastboot flash system system.img
fastboot flash persist persist.img
fastboot flash boot boot.img
fastboot flash dtbo dtbo.img
fastboot flash vbmeta vbmeta.img
fastboot flash vendor vendor.img
fastboot reboot
```
可写入flash.bat脚本,放到系统镜像同一目录下运行
```
@echo off
@echo Reboot bootloader…
adb reboot bootloader
@echo Flashing device…
fastboot flash system system.img
fastboot flash persist persist.img
fastboot flash boot boot.img
fastboot flash dtbo dtbo.img
fastboot flash vbmeta vbmeta.img
fastboot flash vendor vendor.img
@echo Flashing finish, rebooting system…
fastboot reboot
```
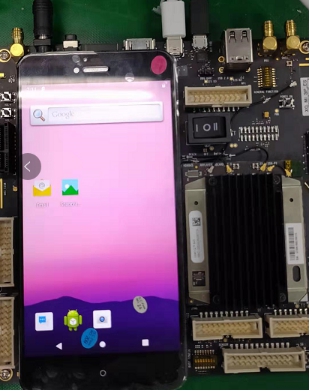
完成后系统重启进入Android桌面。
HDK845官方README
- Introduction
This release is intended to use for Intrinsyc Open-Q 845 HDK Development Kit.
This release uses the standard Codeaurora.org source code as open source development environment.
Please make sure to use the Release notes.
Scope
This document assumes prior knowledge of Android source build process.
The board comes with preprogrammed boot-loader and Android 9.0.0.
User can program from bootloader to all images on target.Directory structure
Open-Q_845_Android-P_v2.1
|– Binaries —————————————-Prebuilt Binaries
| |– boot.img ———————————–Linux kernel and ramdisk
| |– dtbo.img ———————————–Linux kernel device tree overlay
| |– flashall.bat ———————————Windows batch file to autoload/program images using fastboot
| |– flashall.sh ———————————-Linux shell script to autoload/program images using fastboot
| |– persist.img ——————————Android persist partition
| |– system.img ——————————–Android core OS partition
| |– vbmeta.img ——————————–Android VBMeta partition
| -- vendor.img --------------------------------Android vendor partition | |-- README.txt --------------------------------------This document | |-- usb_driver/ -------------------------------------Windows USB driver | |-- amd64/ | | |-- NOTICE.txt | | |-- WdfCoInstaller01009.dll | | |-- winusbcoinstaller2.dll | | – WUDFUpdate_01009.dll
| |– androidwinusb86.cat
| |– androidwinusba64.cat
| |– android_winusb.inf
| |– i386/
| | |– NOTICE.txt
| | |– WdfCoInstaller01009.dll
| | |– winusbcoinstaller2.dll
| | -- WUDFUpdate_01009.dll | – source.properties
|
|
|-- Source_Package ----------------------------------Source code patches |-- getSource_and_build.sh ----------------------Main download and build script |-- proprietary.tar.gz --------------------------Qualcomm Proprietary Binaries – patches ————————————-Patches for Open-Q 845 support
- How to use this release
4.1 Setup the Android build environment for Android Source code build.
4.2 Copy Source Package to build / work directory.
Note: Before proceeding make sure your internet connection is fine to download code from Code Aurora, and you have necessary hard-disk space.
For complete compilation minimum 100GB free space is recommended.
4.3 Copy the Source_Package to build machine.
4.5 Use following commands to compile the source code
user@builmachine$ cd Source_Package
user@builmachine$ chmod +x getSource_and_build.sh
user@builmachine$i ./getSource_and_build.sh
The script downloads the source code from codeaurora.org and starts the build process.
4.6 If download and compilation fails script will report error, otherwise you will get the compiled binaries under
…/out/target/product/sdm845
– boot.img ————————————Linux kernel and ramdisk
– dtbo.img ————————————Linux device tree overlay
– system.img ———————————-Android core OS partition
– userdata.img ——————————–Android User data partition
– vbmeta.img ——————————–Android VBMeta partition
– vendor.img ——————————–Android vendor partition
To program these images, connect micro USB cable to target and copy flashall.sh to …/out/target/product/sdm845/
And run the script as below:
./flashall.sh this will program the image and reboot the device.
- Setting up adb for devices
5.1 Setting up ADB in Linux
5.1.1.1 Setup the Android SDK for adb binaries or use the build terminal
Create file etc/udev/rules.d/51-android.rules with following lines
#for Fastboot bootloader interface
SUBSYSTEM==”usb”, ATTR{idVendor}==”18d1”, MODE=”0777”, GROUP=”adm”
#for Device adb interface
SUBSYSTEM==”usb”, ATTR{idVendor}==”05c6”, MODE=”0777”, GROUP=”adm”
5.1.2 Reboot Linux machine and connect devices with micro USB cable
Make sure adb binary is in the path or you are in the build terminal
5.2 Setting up ADB in Windows
Download Android SDK Platform-Tools for Windows.
https://developer.android.com/studio/releases/platform-tools.html
You only need to download Android SDK Platform-Tools and Google USB Driver, if you just want to play with the phone. If you plan to develop apps, install also the API of your choice and Eclipse Classic (this is the recommended version by Google devs).
To make available everywhere your platform tools (adb, fastboot, etc.), add your platform-tools directory to Path:
Connect USB cable to target.
Device will appear as Android and install the drivers from usb_driver folder.
Please note:
Default there are 4 functional interfaces created only one is ADB other are used as diagnostic purpose (QPST, MDM, DIAG, MASS STORAGE).
Only one endpoint with following is applicable for ADB.
Your android_winusb.inf file should have below lines ADB.
android_winusb.inf
[Google.NTx86]
;Qualcomm SURF/FFA
%SingleAdbInterface% = USB_Install, USB\VID_05C6&PID_9025
%CompositeAdbInterface% = USB_Install, USB\VID_05C6&PID_9025&MI_01
%SingleAdbInterface% = USB_Install, USB\VID_05C6&PID_9025
%SingleAdbInterface% = USB_Install, USB\VID_05C6&PID_9025&MI_01
;Qualcomm SURF/FFA (PTP+ADB)
%SingleAdbInterface% = USB_Install, USB\VID_05C6&PID_904E
%CompositeAdbInterface% = USB_Install, USB\VID_05C6&PID_904E&MI_01
%SingleAdbInterface% = USB_Install, USB\VID_05C6&PID_904E
%SingleAdbInterface% = USB_Install, USB\VID_05C6&PID_904E&MI_01
;Qualcomm SURF/FFA (MTP+ADB)
%SingleAdbInterface% = USB_Install, USB\VID_05C6&PID_9039
%CompositeAdbInterface% = USB_Install, USB\VID_05C6&PID_9039&MI_01
%SingleAdbInterface% = USB_Install, USB\VID_05C6&PID_9039
%SingleAdbInterface% = USB_Install, USB\VID_05C6&PID_9039&MI_01
;Qualcomm SURF/FFA (UMS+ADB)
%SingleAdbInterface% = USB_Install, USB\VID_05C6&PID_9015
%CompositeAdbInterface% = USB_Install, USB\VID_05C6&PID_9015&MI_00
%SingleAdbInterface% = USB_Install, USB\VID_05C6&PID_9015
%SingleAdbInterface% = USB_Install, USB\VID_05C6&PID_9015&MI_00
[Google.NTamd64]
;Qualcomm SURF/FFA
%SingleAdbInterface% = USB_Install, USB\VID_05C6&PID_9025
%CompositeAdbInterface% = USB_Install, USB\VID_05C6&PID_9025&MI_01
%SingleAdbInterface% = USB_Install, USB\VID_05C6&PID_9025
%SingleAdbInterface% = USB_Install, USB\VID_05C6&PID_9025&MI_01
;Qualcomm SURF/FFA (PTP+ADB)
%SingleAdbInterface% = USB_Install, USB\VID_05C6&PID_904E
%CompositeAdbInterface% = USB_Install, USB\VID_05C6&PID_904E&MI_01
%SingleAdbInterface% = USB_Install, USB\VID_05C6&PID_904E
%SingleAdbInterface% = USB_Install, USB\VID_05C6&PID_904E&MI_01
;Qualcomm SURF/FFA (MTP+ADB)
%SingleAdbInterface% = USB_Install, USB\VID_05C6&PID_9039
%CompositeAdbInterface% = USB_Install, USB\VID_05C6&PID_9039&MI_01
%SingleAdbInterface% = USB_Install, USB\VID_05C6&PID_9039
%SingleAdbInterface% = USB_Install, USB\VID_05C6&PID_9039&MI_01
;Qualcomm SURF/FFA (UMS+ADB)
%SingleAdbInterface% = USB_Install, USB\VID_05C6&PID_9015
%CompositeAdbInterface% = USB_Install, USB\VID_05C6&PID_9015&MI_00
%SingleAdbInterface% = USB_Install, USB\VID_05C6&PID_9015
%SingleAdbInterface% = USB_Install, USB\VID_05C6&PID_9015&MI_00
[Strings]
SingleAdbInterface = “Android ADB Interface”
CompositeAdbInterface = “Android Composite ADB Interface”
SingleBootLoaderInterface = “Android Bootloader Interface”
When you see a Windows pop-up requesting drivers, provide the usb_driver folder path. Other device notifications from Windows should be ignored.
Each time you change your USB connection type from the Android Settings APP, you will see one time installation pop-up requesting for ADB driver to be installed, provide the usb_driver folder.
代码更新、编译、下载、日志
代码更新
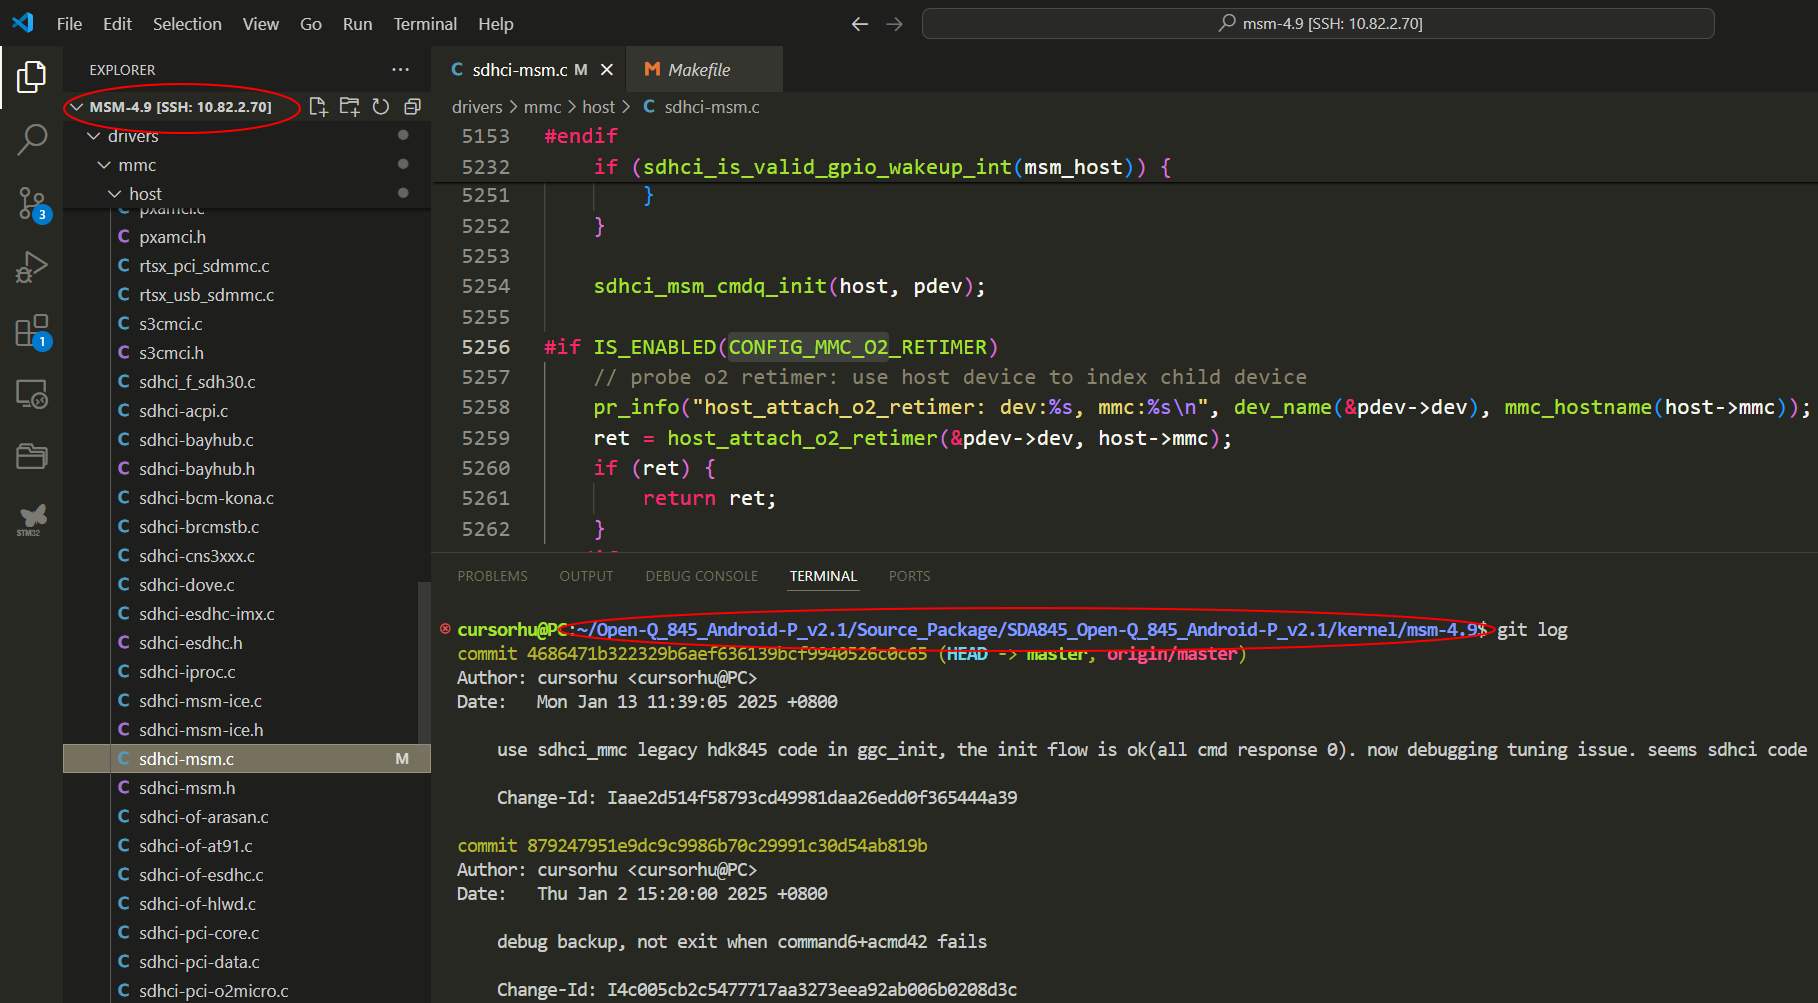
Windows PC的VSCode Remote远程改Linux PC上的代码包,配置ssh ip为Linux Host的IP
重新编译和下载img
见1.4和2.2节。
Source_Package目录执行:
1 | ./bm_rebuild.sh |
拔ADB线,按vol- 启动平台进入测试模式,再插ADB线,才可以下载img
1 | source flash_img.sh |
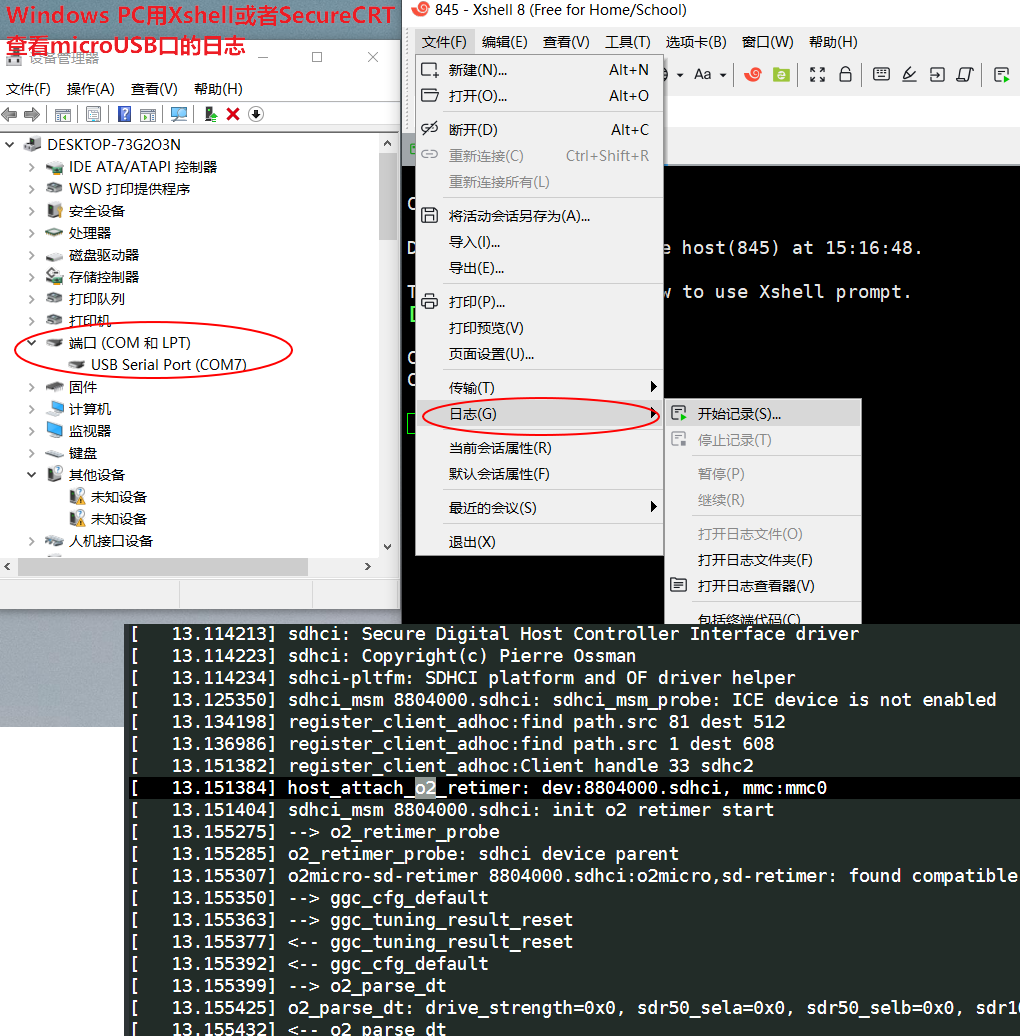
查看日志
下载完毕重启,即可通过microUSB的输出查看日志
附录-安卓编译生态
高通平台HDK845推荐的编译环境如下:
| HOST | Toolchain | Source code repository | build out Android version |
|---|---|---|---|
| Ubuntu14.04/16.04/18.04 LTS | Clang/LLVM | CAF | support Android 9 Pie |
理论上支持android编译的环境:
| HOST | Linux 稳定发行版(ubuntu/centOS/…) |
|---|---|
| Hard Disk | size > 200GB |
| Memory | Memory size > 8GB |
| CPU | 无严格要求,最好Core > 4 Frequency > 3.0GHz |
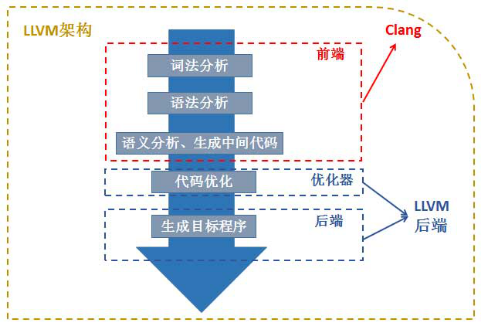
*Clang和LLVM的关系*:
*CAF和ASOP的关系*
CAF is *Code Aurora repository.* It’s the place where Qualcomm releases source code for their phone processors. It’s directly supported by Qualcomm and it’s generally a more optimized branch for Snapdragon phones.
Actually, there are two main baselines for support of Qualcomm devices:
*CodeAurora (CAF)* - These are Qualcomm’s reference sources for their platform. This is what they provide to OEMs, and what nearly all OEMs base their software off of. As a result - nearly all non-Nexus devices are running kernels/display HALs/etc. that are derived from a CAF baseline.
*Google’s software baseline*, or *AOSP* - Usually when Google starts working on a new Android version, they’ll fork from CAF at the beginning. Very often Google will be adding “new” features specific to the new Android version, while Qualcomm will continue with performance enhancements and bugfixes against the “old” baseline.
So when a new Android revision comes out, you have two baselines: CAF which is usually “ahead” in performance but “behind” in features, while AOSP is “behind” in performance (relatively) but “ahead” in features.
Nowadays, developers are directly compiling the builds from CAF source code which is really difficult as this is what Google does initially before upgrading to a new version, and then they add features and the source by the time gets ‘compilable’, it is easier to compile the one on Google Sources than the one which is there on CAF.
CAF can be considered as Vanilla version of a Vanilla version of Android.
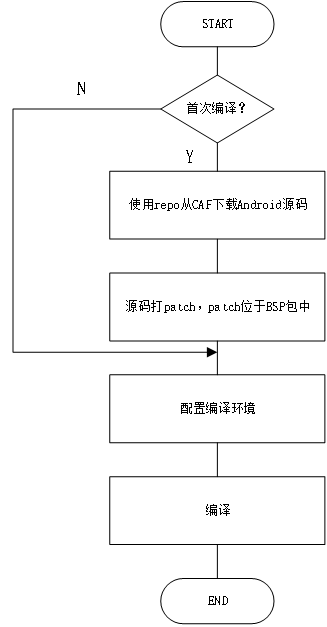
*在线下载和编译的流程:*
附录-交叉编译概念
本地编译和交叉编译
本地编译
本地编译可以理解为,在当前编译平台下,编译出来的程序只能放到当前平台下运行。平时我们常见的软件开发,都是属于本地编译:
比如,在 x86 平台上编写程序并编译成可执行程序。这种方式下,我们使用 x86 平台上的工具,开发针对 x86 平台本身的可执行程序,这个编译过程称为本地编译。
交叉编译
交叉编译可以理解为,在当前编译平台下,编译出来的程序能运行在体系结构不同的另一种目标平台上,但是编译平台本身却不能运行该程序:
比如,在 x86 平台上,编写程序并编译成能运行在 ARM 平台的程序,编译得到的程序在 x86 平台上是不能运行的,必须放到 ARM 平台上才能运行。
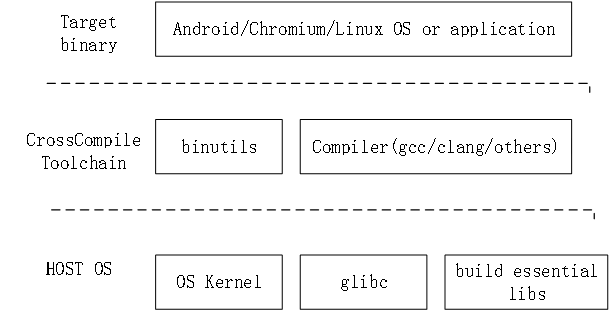
交叉编译工具链
常见的编译过程如下图。编译过程包括了预处理、编译、汇编、链接等功能。每个子功能都是一个单独的工具来实现,它们合在一起形成了一个完整的工具集。
****交叉编译链****就是为了编译跨平台体系结构的程序代码而形成的由多个子工具构成的一套完整的工具集。同时,它隐藏了预处理、编译、汇编、链接等细节,当我们指定了源文件时,它会自动按照编译流程调用不同的子工具,自动生成最终的二进制程序映像。
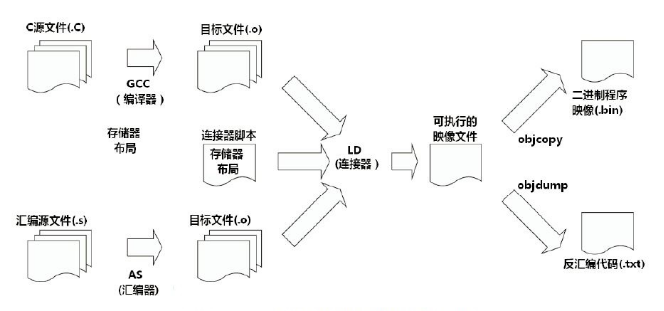
如上图,交叉编译工具链中最主要的部分包含编译器(如gcc),汇编器(如as),连接器(如ld)。通常as和ld及objcopy等其他工具由GNU打包成了binutils(binary utilitys)工具,再加上编译器组成整个工具链。
交叉编译工具链中编译器的命名规则,以如下为例
arm-linux-androideabi-gcc
arm-linux-gnueabihf-clang
命名规则为:
*arch-core-kernel-system-compiler*
arch:目标平台架构,如arm, x86_64。
core: 目标平台的CPU Core,如Cortex A8
kernel: 目标平台所运行的OS,如Linux,Android,bare(无OS)。
systen:交叉编译链所选择的库函数和目标系统的规范,如gnu,gnueabi等。
compiler: 编译器名,如gcc, g++,clang,clang++
ABI:二进制应用程序接口(Application Binary Interface (ABI) for the ARM Architecture)。在计算机中,应用二进制接口描述了应用程序(或者其他类型)和操作系统之间或其他应用程序的低级接口。
EABI:嵌入式ABI。嵌入式应用二进制接口指定了文件格式、数据类型、寄存器使用、堆积组织优化和在一个嵌入式软件中的参数的标准约定。开发者使用自己的汇编语言也可以使用 EABI 作为与兼容的编译器生成的汇编语言的接口。
两者主要区别是,ABI是计算机上的,EABI是嵌入式平台上(如ARM,MIPS等)。
交叉编译架构
HOST OS 通常为Linux,包含自身的kernel、glibc基础库和Target程序的依赖库。Toolchain包含C/C++及其他语言编译器和汇编、链接器等组件。Toolchain依赖于HOST的glibc基础库。Target binary是编译出的目标镜像/程序,编译过程依赖于Toolchain及HOST的build essential libs。